
Excellent work!
How did you made the handshake effect for your video renders? I suppose is it some blueprint code.
Thanks! Yes, I’m using DF Shadows and cascaded shadows.
Cascaded will give you the definition you need for medium-small details nearby. You must tweak Dynamic Shadow Distance Stationary Light and Distribution Exponent to achieve what bests suits you. I also like to decrease Shadow Bias (default is 0.5 and I usually set it to 0.3 or 0.2) to increase definition. The trade-off is that you’ll start getting visible shadow banding so it must be tweaked with caution.
Outside the Cascaded Shadows radius the DF Shadows take place (if they’re enabled, of course). They aren’t near as detailed as cascaded but they do a good job for medium-far distance foliage (and even buildings sometimes). I like to reduce Ray Start Offset Depth Scale to get some extra detail on them.
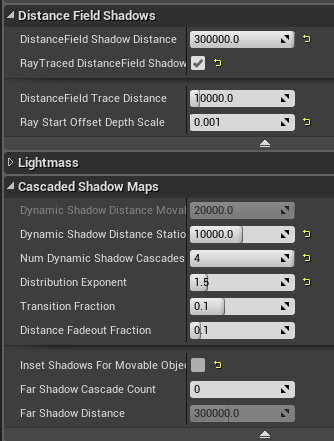
Sometimes I also use Contact Shadows to add some extra detail to small objects. It’s good for grass, but be you need to be careful because real lawns are denser than what you’re probably recreating in real-time and the individual blades shadows in real life won’t be so noticeable as it will in your sparser UE4 lawn (thus revealing a lot of contact shadows in a unrealistic way). Contact Shadows also adds artifacts that are very apparent in flat surfaces.
About AO baked to vertex color, that’s a very handful SpeedTree feature. You can obviously use it for controlled AO in the materials but also as a mask to reduce specular, reduce subsurface and decrease color intensity in the interior of the tree. It gives you artistic power to compensate the absence of baked lighting in your foliage.
For the grass material I use Masked - Two Sided Foliage (with the same vertex AO tricks I use on the trees).
Thank you! It has some blueprint coding involved but the overall process is a lot more lazy than that. 
I’ve used a Vive and a default First Person Char actor:
- Add a SceneCaptureComponent2D in the FPChar linked to one of the Motion Controllers.
- Add a cube linked to the same controller, re-escale till you get a rough smartphone shape
 and apply a material to it with the render target linked to the SceneCaptureComponent2D. Now you have a smartphone filming stuff in VR that you can actually see the stuff it’s capturing in VR
- Add a camera in the world
- In the Level Blueprint, add references to that camera and the actor char.
- Use the Tick node to update the camera’s location and rotation to the same value you’re getting from the character’s SceneCapture
- Add that camera to the Sequence Recorder
- Hit “record” button, start playing your game in VR and recording stuff with your fake smartphone

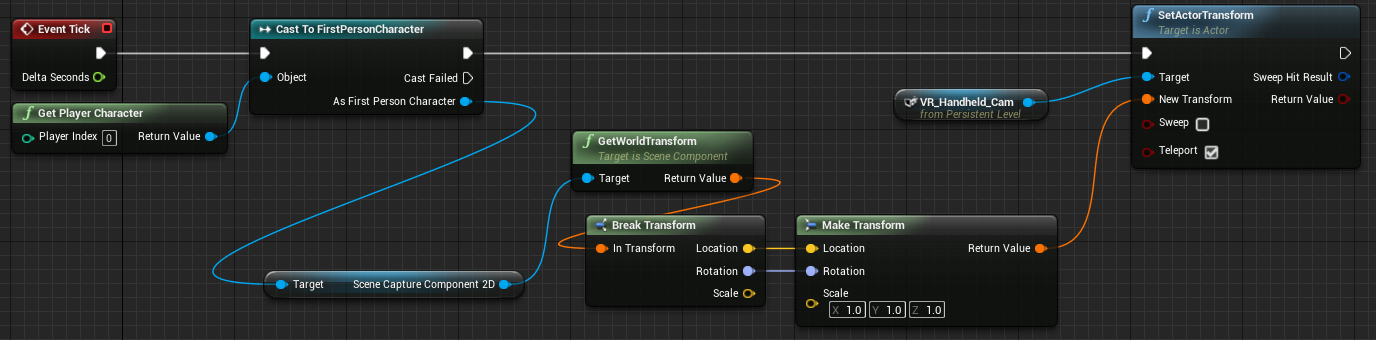
In the end you’ll have a sequence with a motion captured camera. Then you can play it or compose it with other sequences, etc…
2 Likes
Nope. The opacity masks are untouched straight from Speedtree.
Thanks for the detailed answer.
Very cool solution 
I have an already created Sequencer animation in UE. I couldn’t reproduce the camera movement in VR.
I hoped you have implemented Camera Shake Animation, like Epic did in their demos.
Unfortunately, I have didn’t find any documentation/tutorial about this approach.
As a newbie in UE4, I could only admire this project! Amazing!
Hey, guys.
A couple of pictures of some lighting tests that I’ve been doing:


I’m trying to use Lighting Scenarios so I can keep 2 or 3 different lighting situations in that same main level. The drawback is that the amount of RAM used will increase a lot since the lightmaps of all the Lighting Scenarios are loaded at once with the main level.
The other way around would be keeping 2 or 3 copies of the same level with different lighting setups but that workflow is a nightmare when you’re constantly updating the project.
For each Lighting Scenario level I have different:
- Direct light (sun light)
- Sky light
- Sky dome with different EXR sky texture
I’ll be posting the final footage of that project soon.
1 Like
Looking forward to the final footage. Excellent work so far, mate :- )
EDIT: Btw, have u seen this:
Any thoughts on this :- )
1 Like
Thanks!
Yes. I’ve been following that topic. Really promising stuff 
Hello guys.
As I said in the main post, I did a week sprint last month to create a real-time footage of that project for my CGarchitect Award 2018 submission (I got it confirmed in the end).
I was holding it until they published the results. As I didn’t get between the final nominees, I’m sharing it here with you guys with some details about how it was done:

The award rules required a real-time footage (at least 30fps - 1080p) and some player interaction. So I divided the video in two parts. The first one is a Sequencer based footage with simple camera cuts and a song. The second one is a first person walk-through that I controlled with mouse and keyboard.
For the interactive part I set up some sound effects to contribute with the immersion:
- 5min looped ambient sound with wind and distant birds. No localization, it’s always active no matter where you are in the level. There is also a wind chime at distance in that track that I found it added a cool atmosphere to the level.
- A couple of short birds songs that are randomly activated (loop interval between 10s and 1min). Those ones are localized in some of the trees around the house with a 15m radius
- A crossing propeller airplane that randomly triggers in a window between the first 10s and 5min of gameplay.
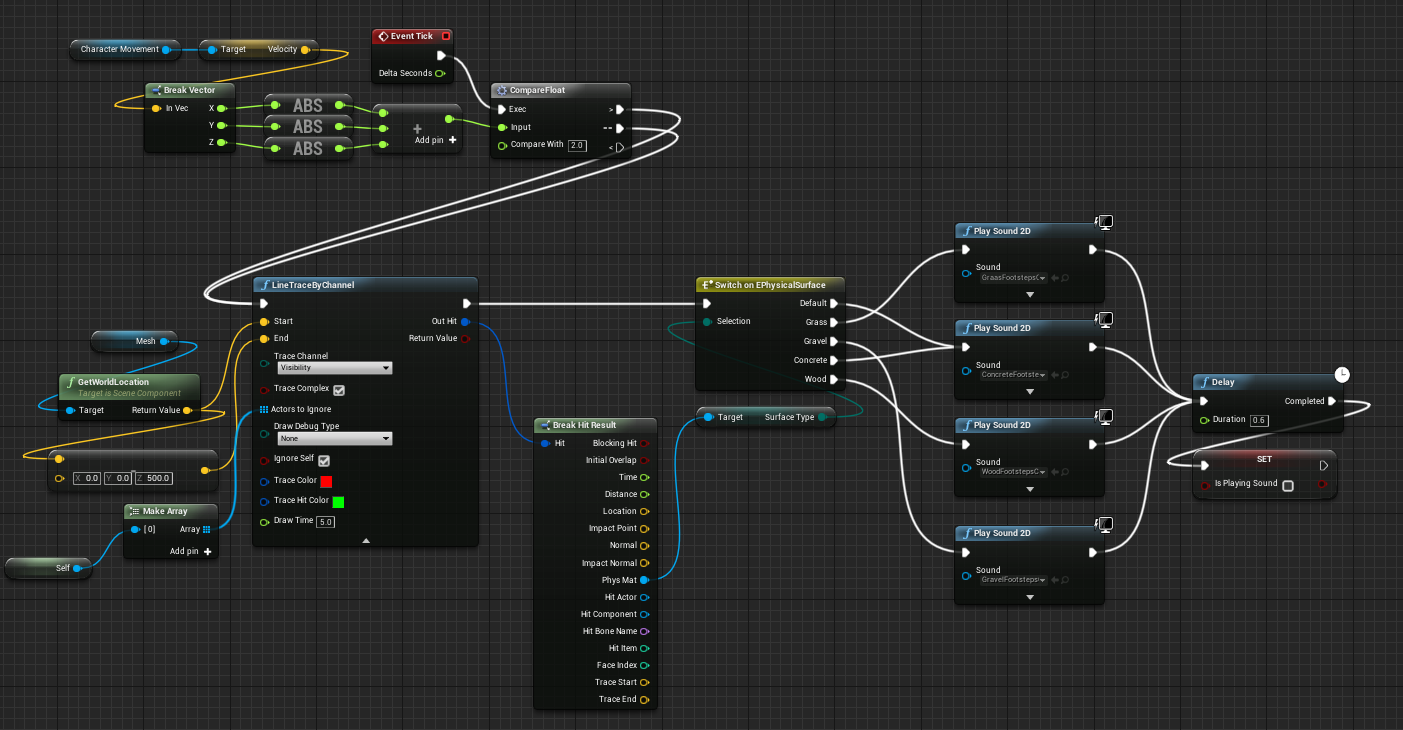
- Different step sounds for grass, gravel, concrete and wood. The player character blueprint handles the surface detection.
Not the best solution for the sound triggering… But I didn’t have enough time and that one got the job done.
I’ve also added an Audio Volume inside the house that slightly reduces overall sound volume and cut off the higher frequencies (all those settings are easily changeable in the Ambient Zone session of Audio Volume settings).
The resolution was set to 1440p and the framerate locked at 30fps (it was oscillating between 33 and 45 without the locking). I’ve captured the screen with Nvidia Shadowplay at 60fps (it produced a smoother video - less stuttering).
PS: The project wasn’t finished when I made that video. So I’m not considering it “official”. I’m still working on my final portfolio footage for that project (my agenda got so crazy during the last couple of weeks and I had to put it on hold for a while). I’ll definitely finish it this weekend 
Cheers
2 Likes
Very Beautiful work, mate. 
1 Like
Amazing work. I would like to have these skills and time to make such a project.
Congracts.
1 Like
Very good work! How are you scattering grass? You used foliage tools for grass? How far is the grass mesh drawn?
1 Like
Thanks.
There is a mix of techniques in that project. Most of the trees are generated with Procedural Foliage Tool. Some are painted with Foliage Tool. There are some individually placed near the house where I needed more control.
The grass is scattered with Landscape Grass Tool and also painted with Foliage Tool where more control is needed.
About the culling distance it depends on the situation. When I need real time performance (like in the CGArchitec Award video above) I reduce the distance to a range between 500 and 10000 meters depending on the asset (higher values for tall assets and lower for the smaller ones). For stills and footage captured with the Sequencer Tool I increase the culling distance up to 20000 for some assets. In both cases it’s important to use a material on the ground that blends well with the grass meshes to hide that culling edge.
1 Like
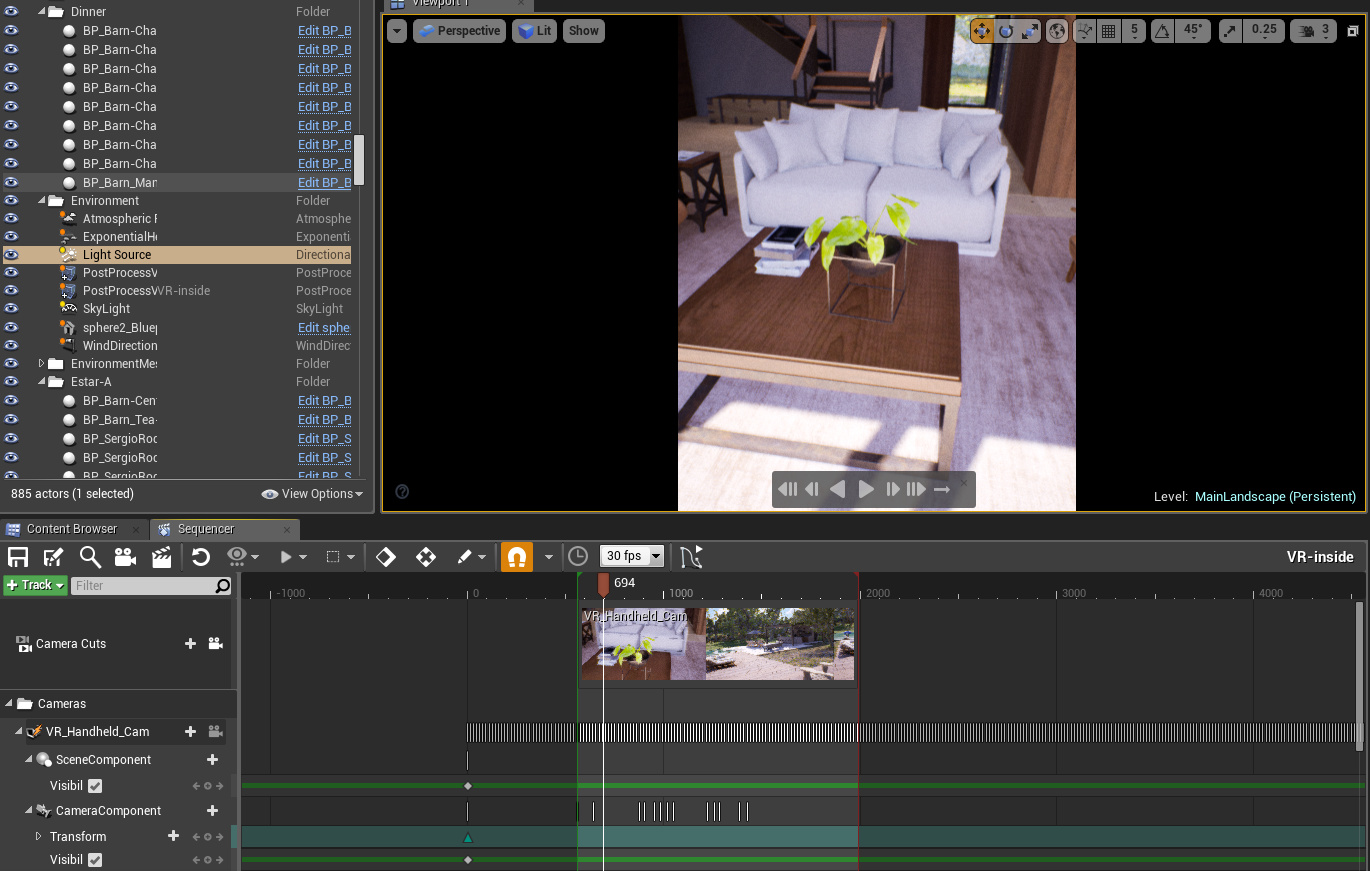
That project became big enough that I gave up trying to show it in a single video. It would be too long and boring… So I decided to create three  . Each one with different focus and mood. I’ll be releasing them in the next couple of days and here is the first one. I hope you guys enjoy it
Cheers
1 Like
Second part:
Hello everyone.
I’ve finally concluded that project with the third video and portfolio posts:
")
https://www.artstation.com/artwork/O8KK6
https://www.behance.net/gallery/69774727/Modern-Barn
Thank you all for the support and feedback. I hope you like it 
3 Likes
Outstanding project! Very realistic looking!!!
Can you share some information on how you made the fire that is seen inside - in the fireplace! I liked it very much!
1 Like
Thanks.
I’ve used the fire material of SunTemple project applied on a couple of planes.