
Originally published at: https://www.ronenbekerman.com/making-clear-lake-house/
Angel Kostov, from the Bulgarian studio 1equals2, shared their CG recreation of the Clear Lake Cottage by MJMA on the Blog’s Facebook Group and today I’m very happy to share the making-of the beautiful snowy image that was part of the set they initially shared.
1equals2 Introduction
1equals2 is a small studio and community, based in Sofia, Bulgaria, lead by Angel Kostov – 3D Artist, Architect, and Passivhaus Designer. The community consists of three members and works predominantly with foreign clients on a freelance/contract basis.
Project Introduction and Inspiration
Above all, I would like to thank Ronen Bekerman for giving us the opportunity to share this lovely contemporary house with You and use the leading ArchViz 3D blog to lead You through a concise making of a Winter Scene.
This tutorial is intended to cover the benefits of doing personal projects rather than an in-depth explanation of tools and settings.
It all started a late evening while looking for inspiration and willing to work on something different regarding scale, environment, and ambiance. I did not want to look at a phone and monitor this time, so decided to go “old-fashioned” way with books!
Luckily, we keep a small and beautiful library of architectural books, and one of them is “Hide and Seek: The Architecture of Cabins and Hideouts”. A perfect “place” to end a long day and easy way to “visit” places, so far away.
It took a while to indulge myself into it, and after a while, I stumbled across the Clear Lake House in Canada, designed by MacLennan Jaunkalns Miller Architects. As an architect, I instantly fell in love with the simplicity of design, open spaces, smart use of materials and great location.
These are renders done in this set…
![]()
![]()
![]()
![]()
![]()
![]()
Goals / Modeling / Texturing
As an artist, who likes simple and practical tools in a workflow, I wanted to explore new boundaries with this project, but at the same time keep to our usual flow and habits.
I did not want to stretch the modeling of every single object, so had to narrow the elements which are of primary necessity – the house itself, the site, the kitchen isle, a chair and a few stone slabs.
Most of the site elements are objects from different libraries – Evermotion, VIZPARK Boulders Pack and furniture from 3dsky.
Defining the “rings” of detail, helped me to focus on the most important objects and only adjust those outside, if visible in camera.
Nothing special and in a way the old-fashioned application of quad poly modeling technique.
The stone slates were quickly generated with the Debris Maker Script. Then used Unwrap UVW Modifier to adjust the texture appropriately.
Having used RailClone for quite a while, I decided that although rather small, there are several objects where the iToo Software plugin can be really handy. In particular – decking, corrugated metal roof, elevations and plywood paneling underneath the roof.
I used predominantly custom Linear 1S Generators, with already modeled objects and custom clipping splines, which define the void. The only exception was the plywood paneling, which was done using the same principle but inside Linear 2S Railclone Generator.
Apart from using the plugin and modeling, only what is necessary, we had another “mini-challenge” in mind – to explore the use of Corona Renderer during this project.
We did not aim to recreate perfect realistic shaders, and photo-real images, but to adopt a workflow which can somehow easily implement into commercial projects, within the hardware resources available. 32 GB Ram turned out to be insufficient, especially when a displacement is present and the terrain is populated with vegetation.
PBR principals have not been followed accurately since the primary concept was to adopt a workflow rather than polish skills with shaders, so some of the settings below might be irrelevant for most of the tech-savvy artists and latest Corona Renderer Builds.
Scattering of objects was done with ForestPack, by using spline boundary and same vegetation objects.
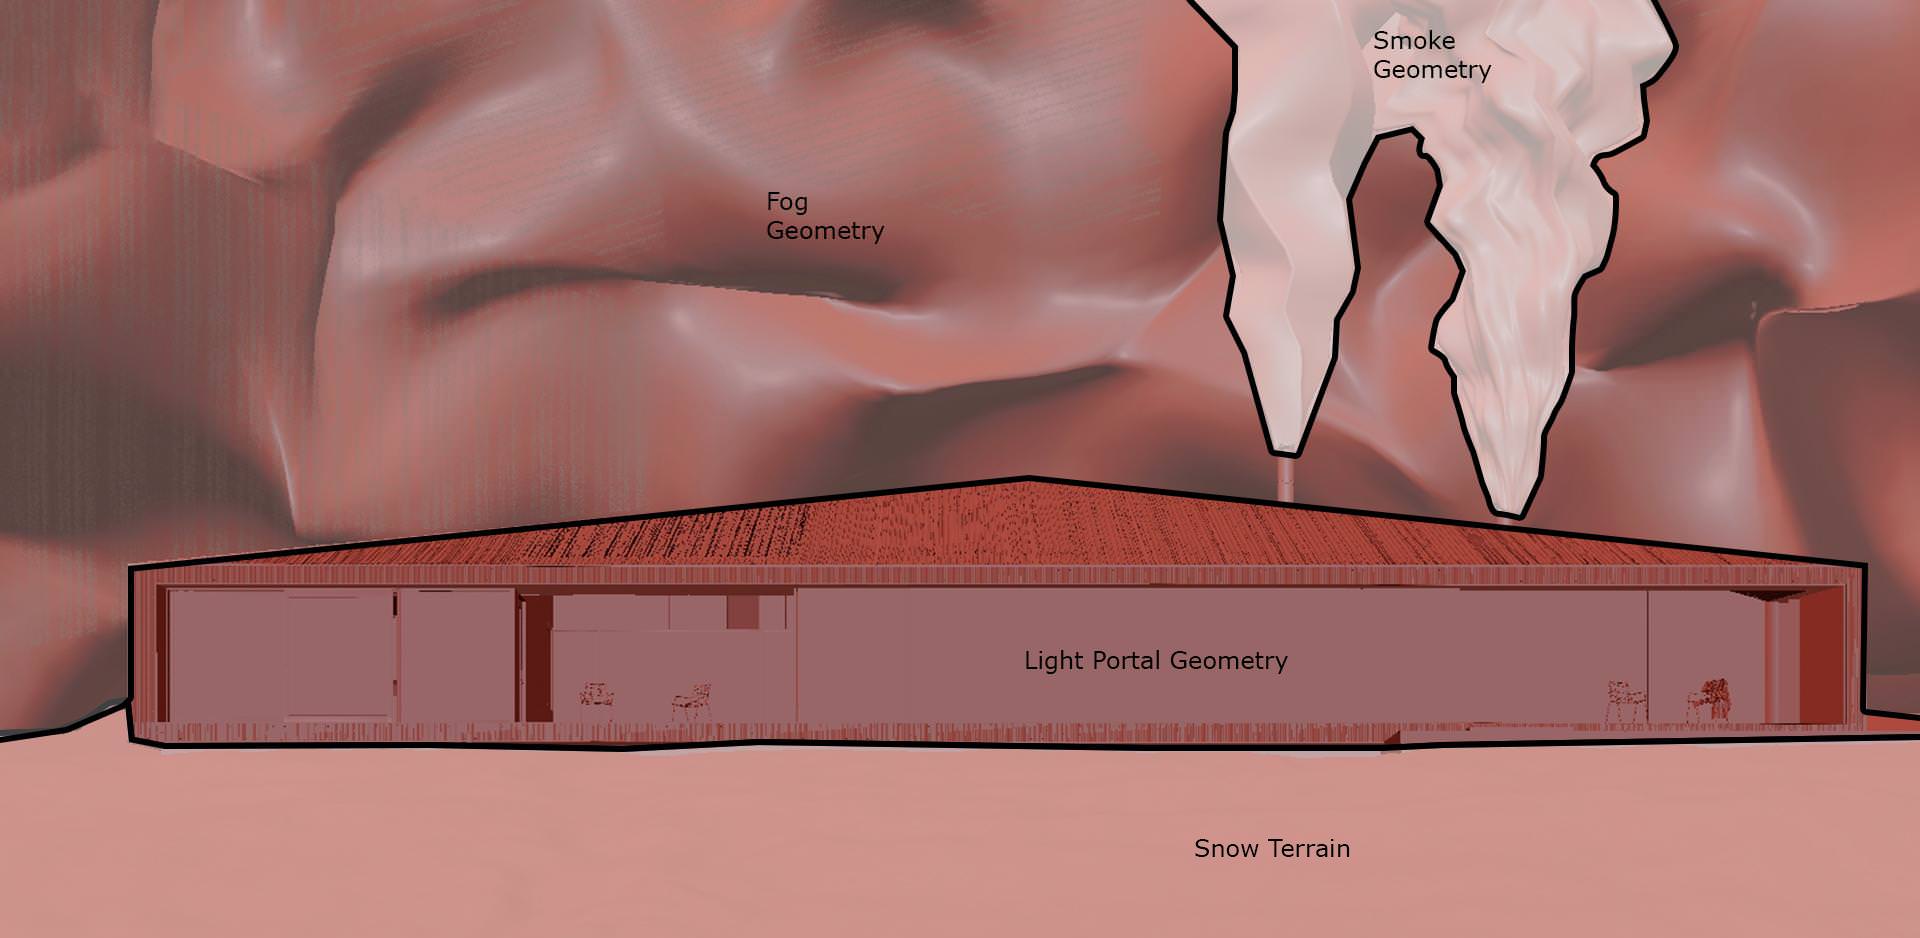
Fog and smoke are simple boxes being heavily adjusted with modifiers – predominantly noise and turbo smooth, and Corona Volume Material applied afterward.
Textures are from the ubiquitous www.textures.com, Real Displacement Textures, and Extreme Textures.
Glass Shader uses custom-made texture, which has been painted in Photoshop after the glass pane has been initially unwrapped.
The technical time for modeling and assembling the scene took, roughly, three weeks in-between doing other commercial projects.
![]()
![]()
![]()
![]()
![]()
![]()
![]()
![]()
![]()
Camera / Ambience / Render settings
The elaborated model gave quite many opportunities regarding camera angles and ambiance.
After a couple of days trying to find the most suitable HDRI sky, I decided that should follow the initial project concept – to look for inspiration and use this project to achieve different ambiance done solely in 3d.
In the very same room, where the book was, sitting in front of TV, I found an unexpected inspiration – Ridley Scott’s film “Prometheus.”
The teal/orange color palette used there, in conjunction with the plot and all visual FX, provoked emotions somehow connected with this project.
I associated the building with a spaceship, which has landed on a cold planet.
On the very next day, having a direction in mind I was in the office, setting up a light scenario and colors close to those used in cinematography.
Luckily, Corona Renderer already had a huge time-saver in this direction – Light Mix tab and artist can “paint” with light quickly and at ease.
I decided to keep it simple and use Corona Sun and Sky since I already had objects with Volumetric Materials and was afraid of the noise level in the rendering.
All light sources were divided into separate passes so that I can further control the intensity and color under the Light Mix tab.
In the render below, the camera was set to be frontal on purpose – I wanted to juxtapose the long horizontal building to the vertical tree trunks and stone slats, creating additional tension between objects.
As mentioned earlier, I experienced difficulties rendering displacement, so I completely disabled it.
I experimented further with Corona Renderer Displacement screen size values and found that around 5-6 px it can be computed within the RAM I had available.
Render settings were left at default values.
![]()
![]()
![]()
![]()
The renders above were done specifically for the tutorial and may have noise in them. Bare in mind that LightMix adds additional noise which I believe one can tackle with Denoiser. Most images took between 4 and 8 hrs on single i7 4930k.
Post Production
Having worked on many projects throughout the years inevitably had an impact on habits – especially in Photoshop.
Post-render image adjustments are not something I am happy with and sometimes find myself caught in the trap of “overdoing.” The wise approach, in this case, was to limit amends in PS down to several adjustment layers, Arion FX, and color balance.
As simple as possible.
![]()
![]()
That is all!
I hope you like it and that it helps you, even if just a bit 😉
Feel free to ask away in the comment section below.