Originally published at: https://www.ronenbekerman.com/how-to-leverage-substance-designer-painter-in-archviz/
Kyle Jones, of Pixel Wave, takes us through his process with Substance Designer and Substance Painter and shows us how to leverage these amazing tools in ArchViz with achieving photo-realistic materials as the focus. Enjoy!
I wanted to start off by thanking Ronen Bekerman for his blog and the opportunity to be a part of it!
It has been an excellent source of information and inspiration as I have continued to grow a 3D artist. I am so thankful for the prior artists that have shared their workflows and am excited that I am now able to pass my knowledge onto those artists coming up in the industry.
With that being said, my name is Kyle Jones, and I am the founder of Pixel Wave, a Southern California based architectural visualization firm and today, I want to talk about achieving photo-realistic materials in seconds with Substance Source and Substance Painter.
Introduction
As a 3D artist working with realistic budgets, it is imperative that I have tools that help me push the quality of my work without taking up too much of my time. Like others in this industry, the benefits of a physically based rendering (PBR) workflow have also become essential to my work, as it helps me bring more photorealism into my materials and scenes. So how do I satisfy both issues: the need for photorealism and speed? Substance Source and Substance Painter.
As an artist, I want to focus on being creative, not learning complex programs that bog down my flow. It is the simplicity of the user interface, and the massive amount of control I found through procedural texture creation that led me to integrate Substance Painter and Source materials into my workflow. Both feel like they were created by artists, for artists; and it was nice to find out that I didn’t need to be technically savvy to start using them. In this article, I’m going to show you how I apply both tools to my projects, using a new Mediterranean visualization as a guide.
The Substance Workflow
While you can use either of these tools separately, my two-punch combo usually starts with Substance Source. At its core, Source is a massive, library of scanned PBR materials. Whenever I need a particular material, I search for it and then drop my selection right onto my model.
One of the best parts of the library is that it is continuously being updated with new woods, clothes, tiles, wall textures and more, so it’s something you can go back to again and again. Some of the options even have multiple presets within the material, which gives you more ways to dial in your desired look.
Accessing the library is pretty straightforward, you have three primary methods: the online portal, the link in Painter or through Allegorithmic’s plugin for 3ds Max 2018 & 2019. The plugin allows you to search, download, apply and modify Source materials without even having to leave 3ds Max. It’s like having your integrated material library right in Max. No more searching through gigabytes of texture maps. Texturing things like walls, floors, couches, metals can all be done in the Material Editor which keeps me fast and efficient. Also, I can adjust options like the texture resolution (512 to 8K), material wear and tear, pattern types for things like flooring and cloth, and even save out my custom presets, which saves me a lot of time project to project.
However, let’s say I want a little more control over the textures. This is where Substance Painter comes in. I tend to use Painter a lot as I like to push details. It is also amazing when I need to texture hero assets that are going to be close to the camera.
I start this process by browsing for a Substance Source material, generally through Painter’s integrated link. Once I get my base materials, I then go in and paint micro-details like coffee stain rings on side tables, edge wear on furniture, small normal-map creases on fabrics, even thumbprints on glass and metals! The biggest give away to me that an image is computer generated, is when the image and its materials are too clean. With Painter, it’s easy to create micro-variations that break up perfect looking material into something that looks realistic. It’s these little details that take an okay material and make it look believable.
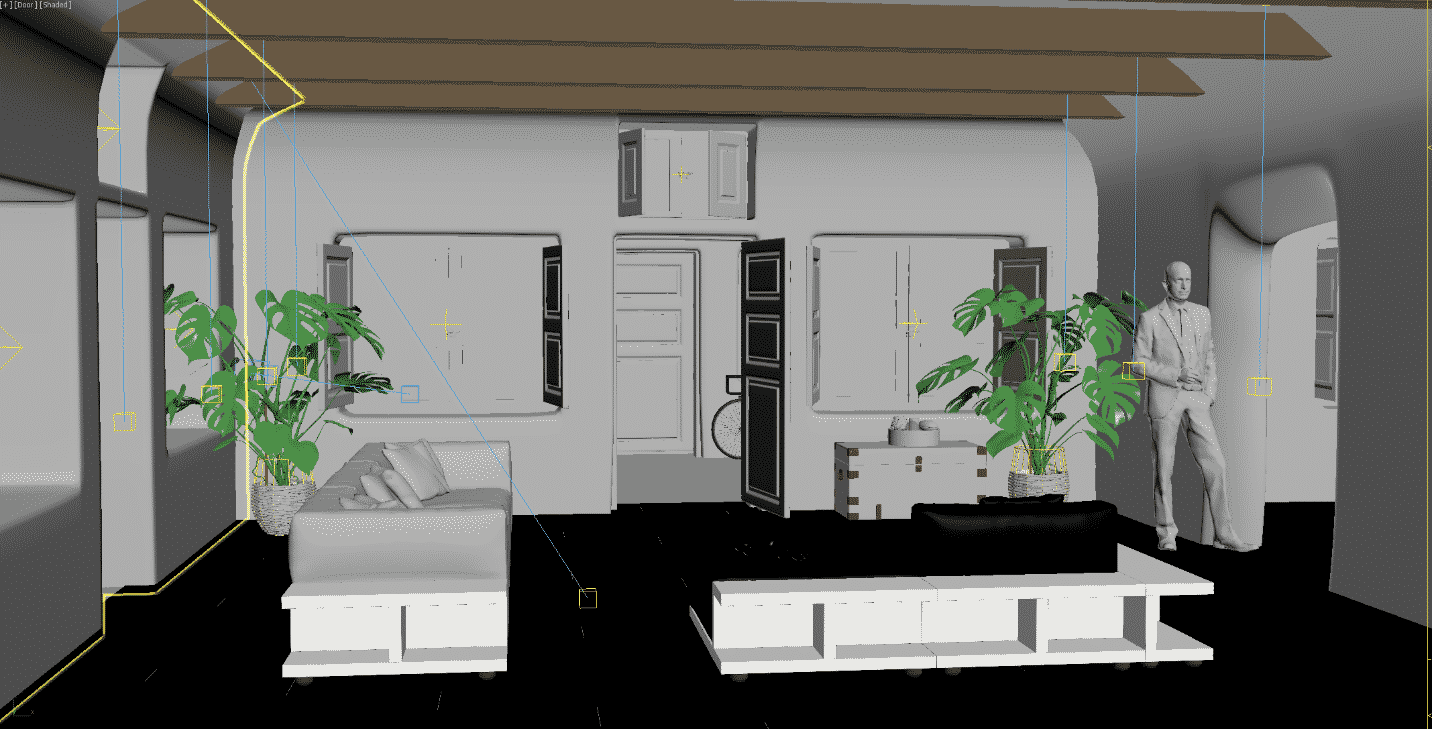
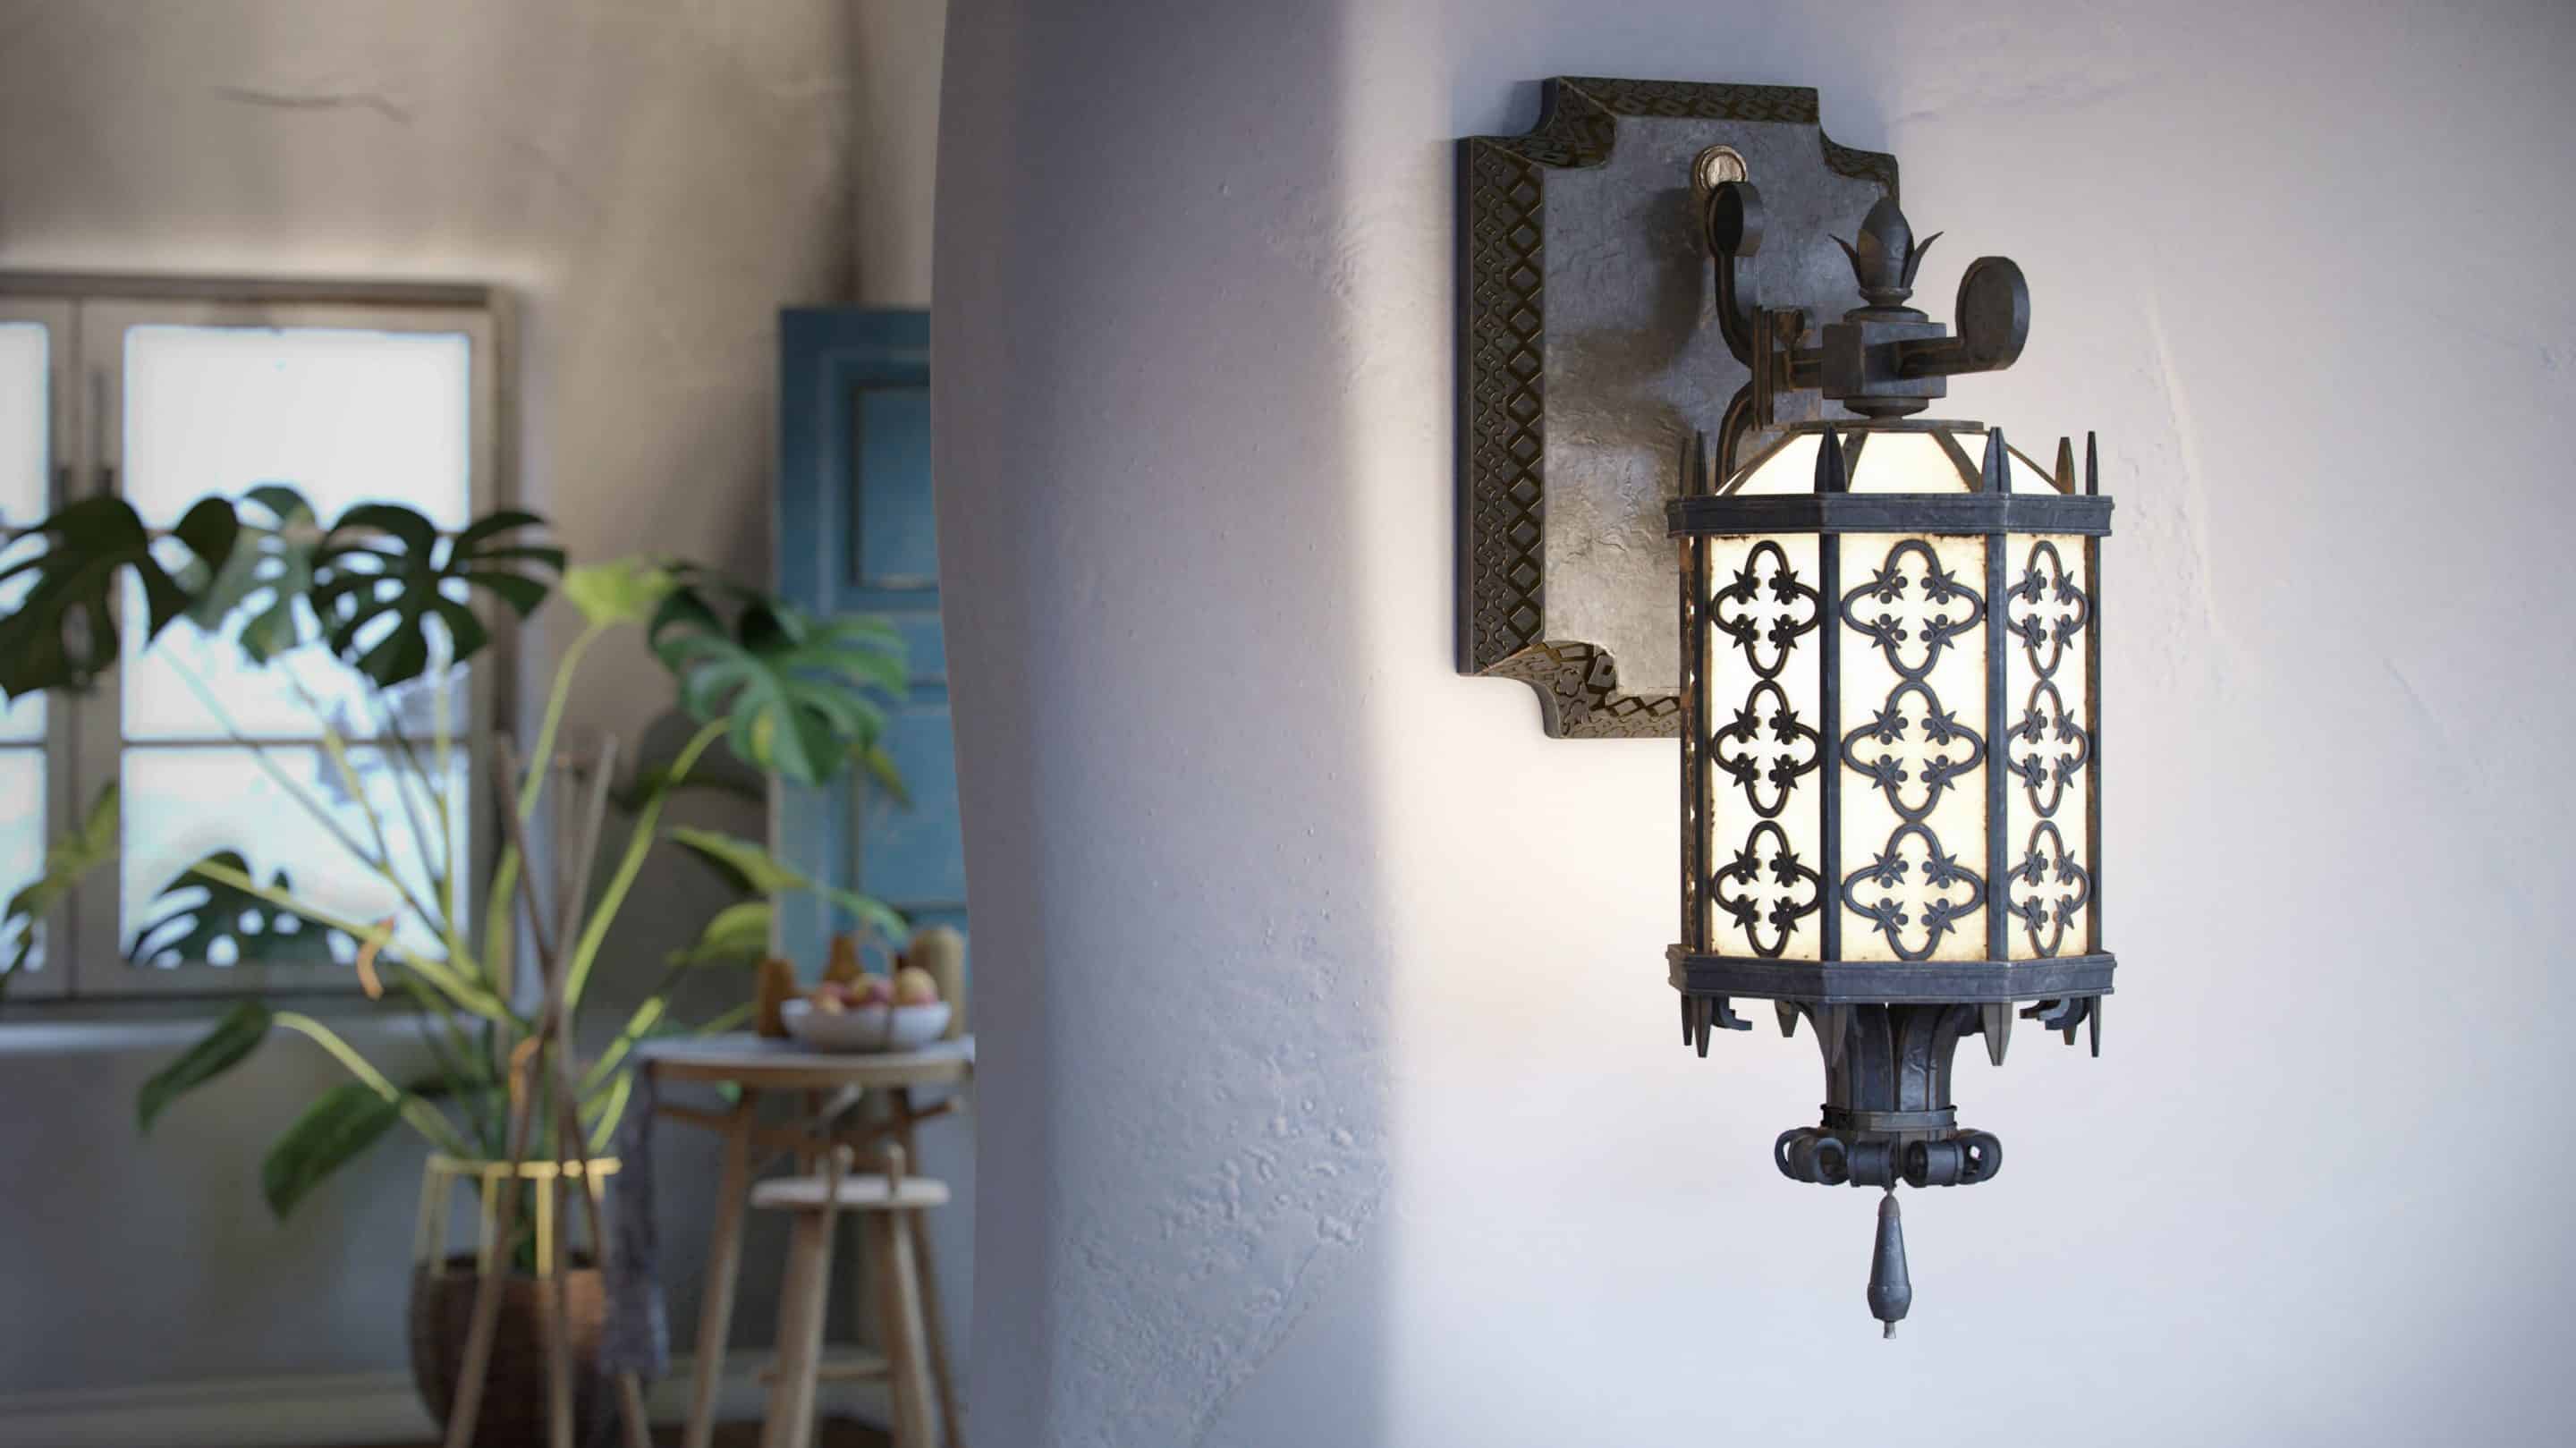
The Mediterranean Project
I think the best way to show what I’m talking about is to bring you into a project that I just finished from top to bottom. So, everything from modeling to rendering, with my texturing workflow mixed in.
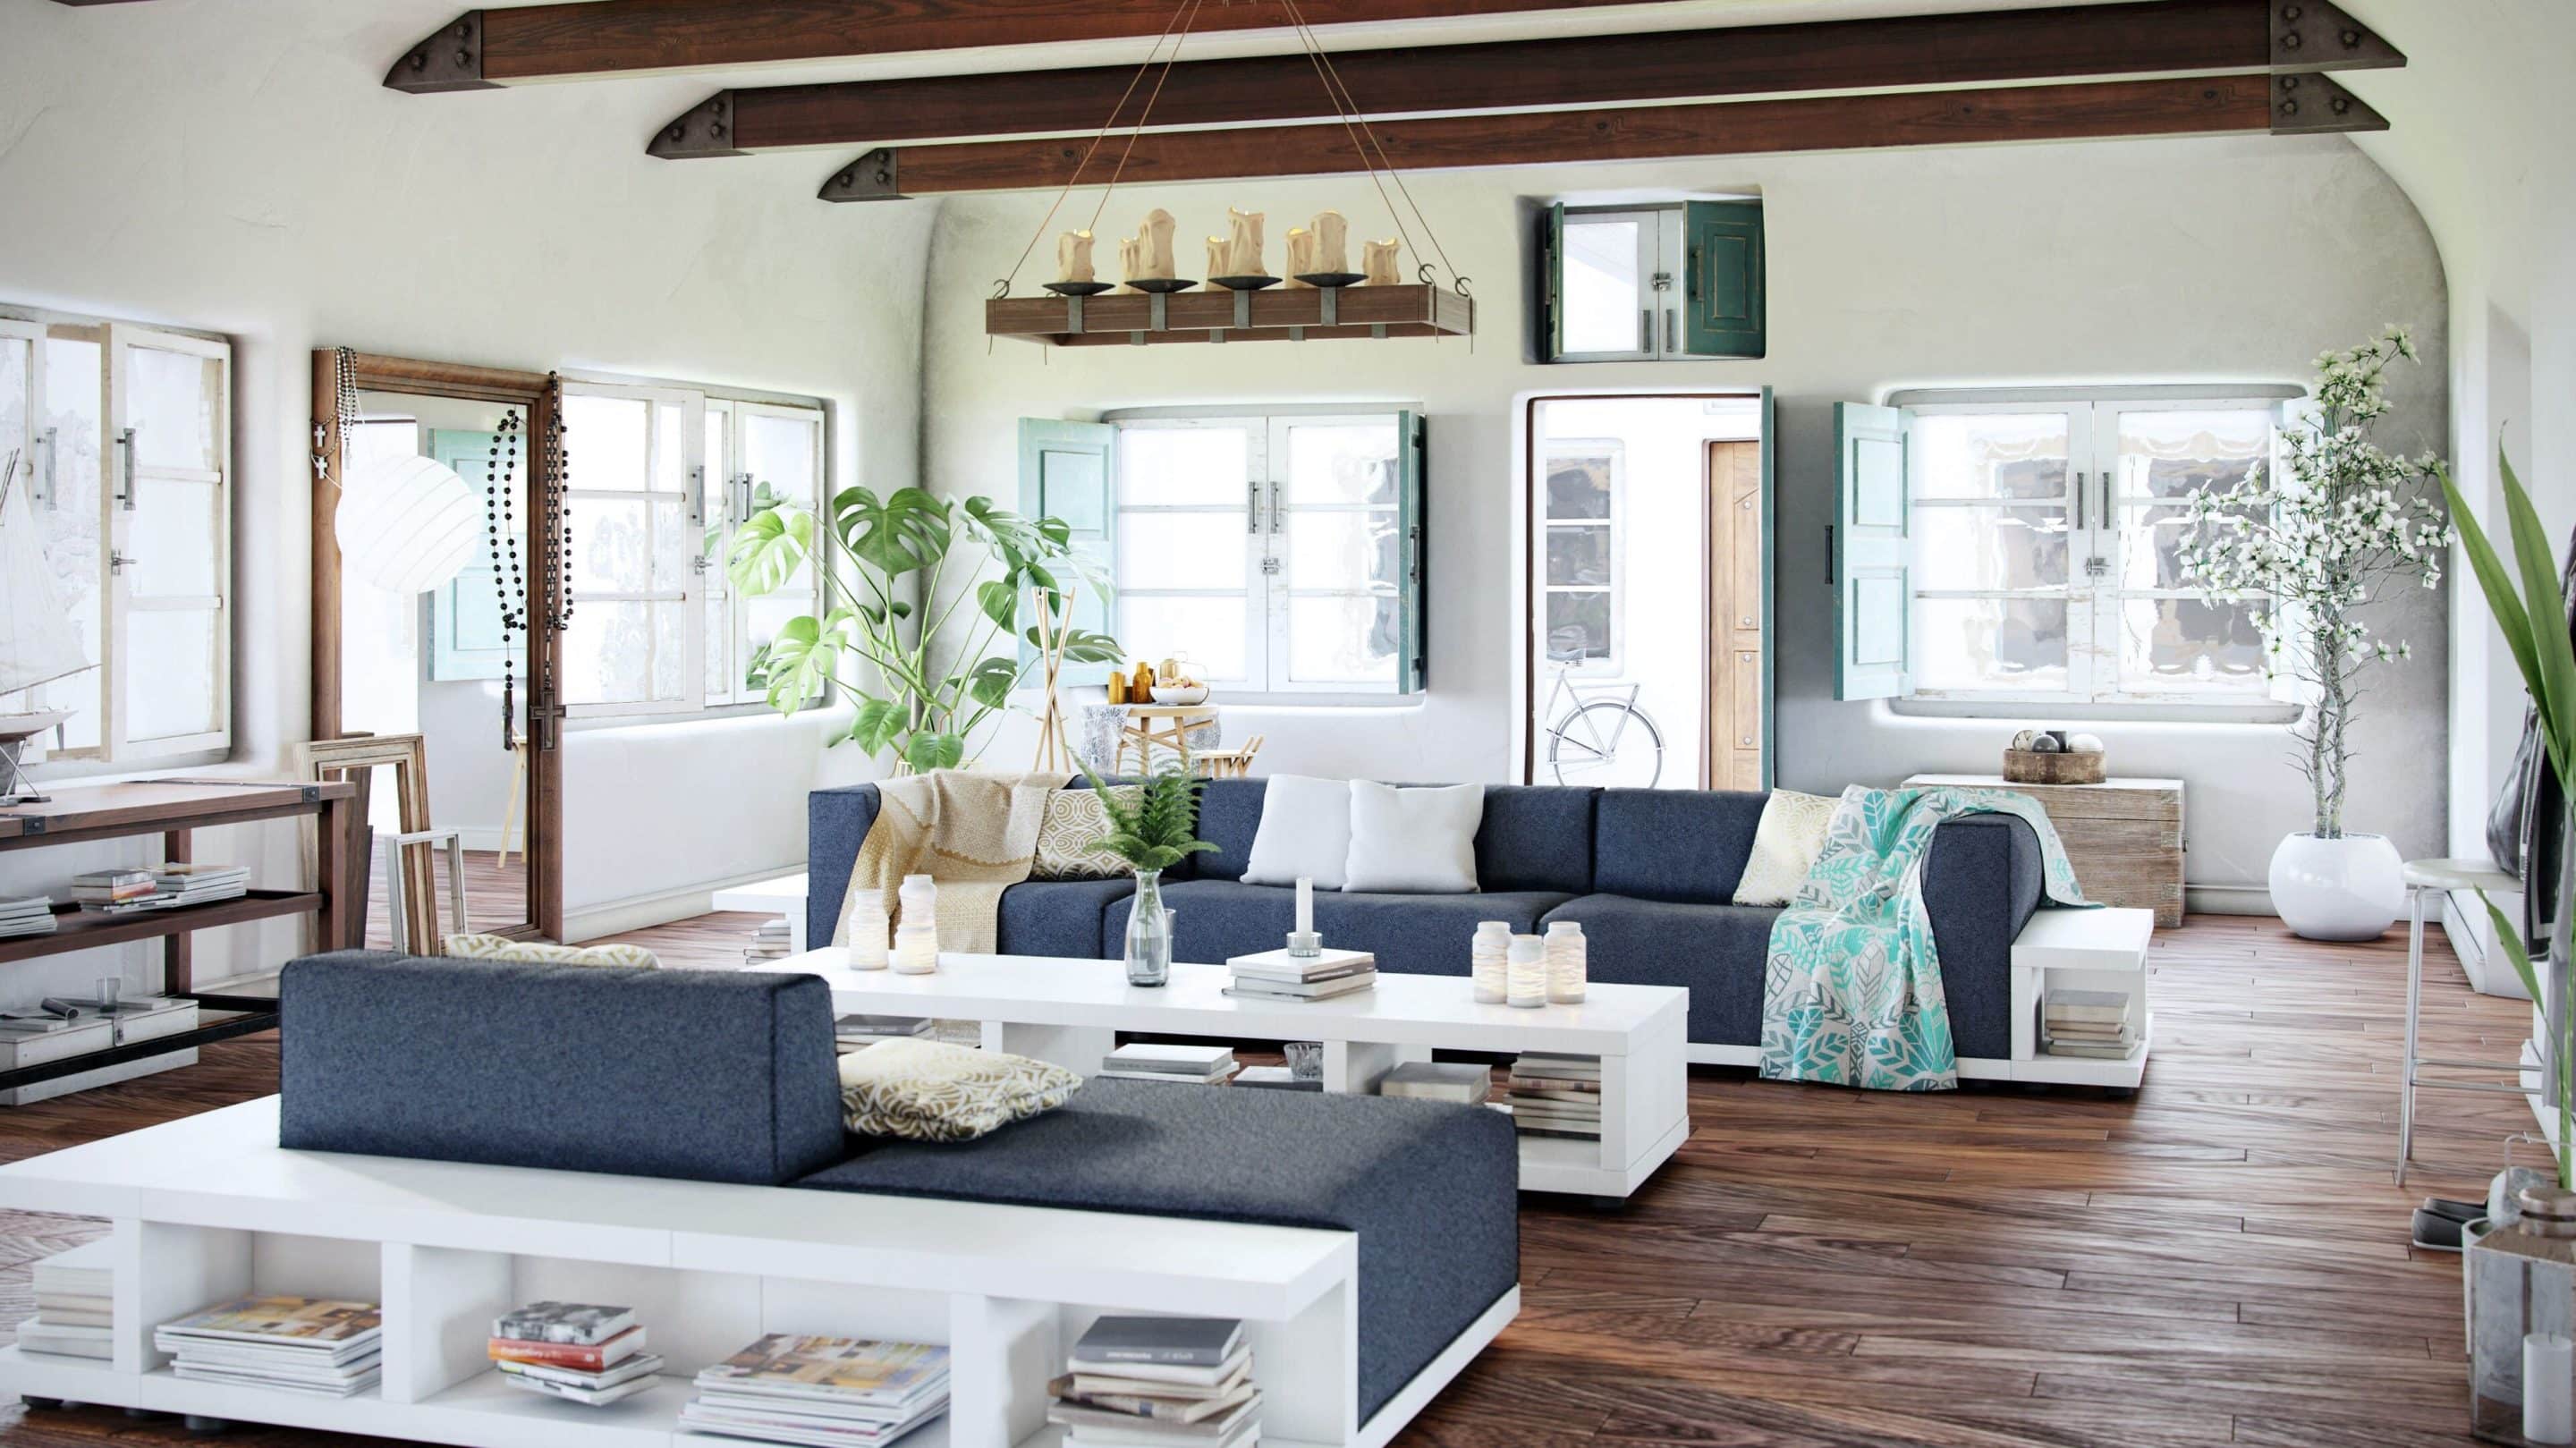
The genesis of this project began on a trip to the Greek islands. I was very taken by the architecture’s clean yet contrasted feel while incorporating very cool colors. I knew I wanted to work on all of that painted plaster, aged wood, and rustic metals into my next design. Furthermore, our industry is flooded with really modern or Scandinavian spaces, so it would be fun to create something that would stand out.
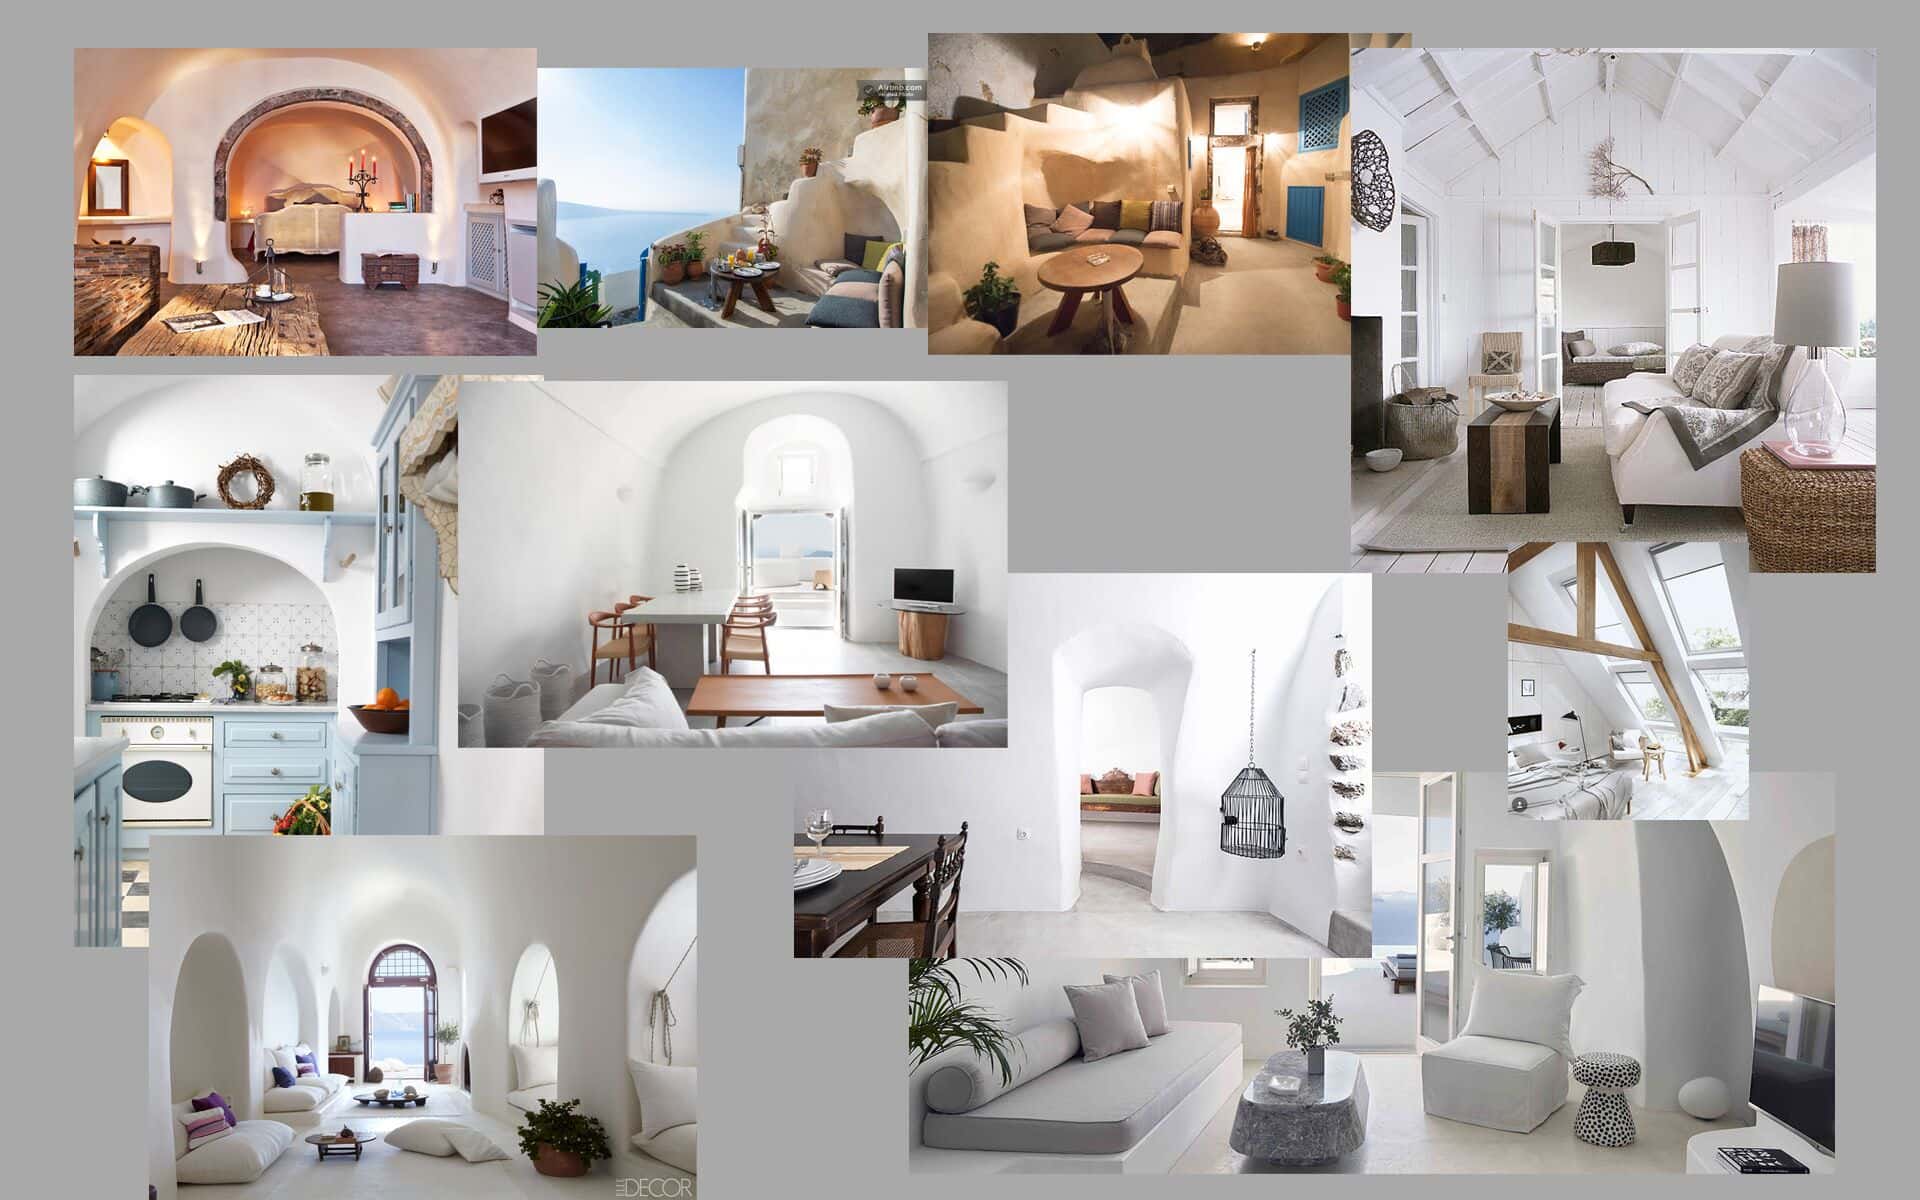
References
All of my architectural projects start with references. It is amazing how poorly our minds are at remembering small details. Gathering resources helps me create those micro variations I mentioned before, increasing the likelihood I can trick the viewer into believing that my visual isn’t computer generated. Most of the references that appealed to me had lots of raw and rustic looking wood, roughly painted walls, mortar walls and plush furniture. That’s a lot of texture information to draw from, so I needed Substance Painter and Source to make it happen.
Modeling
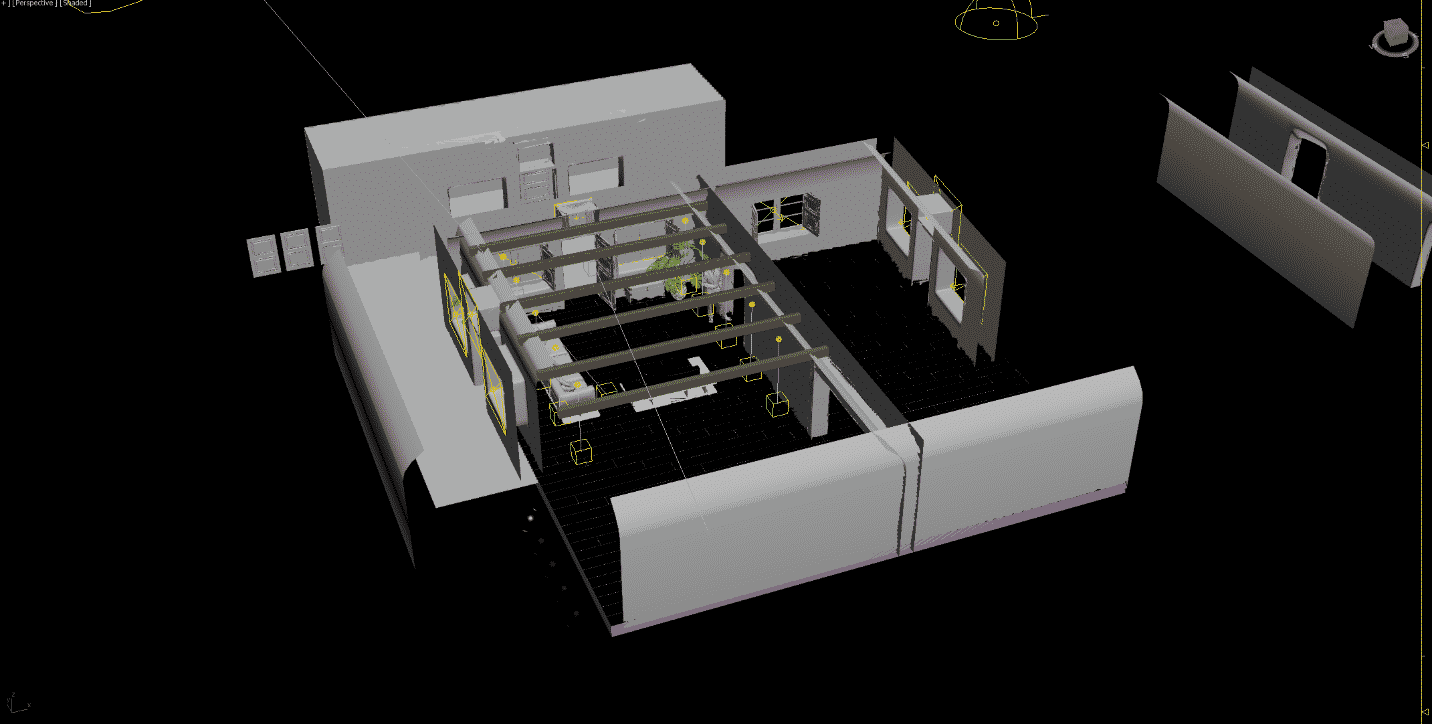
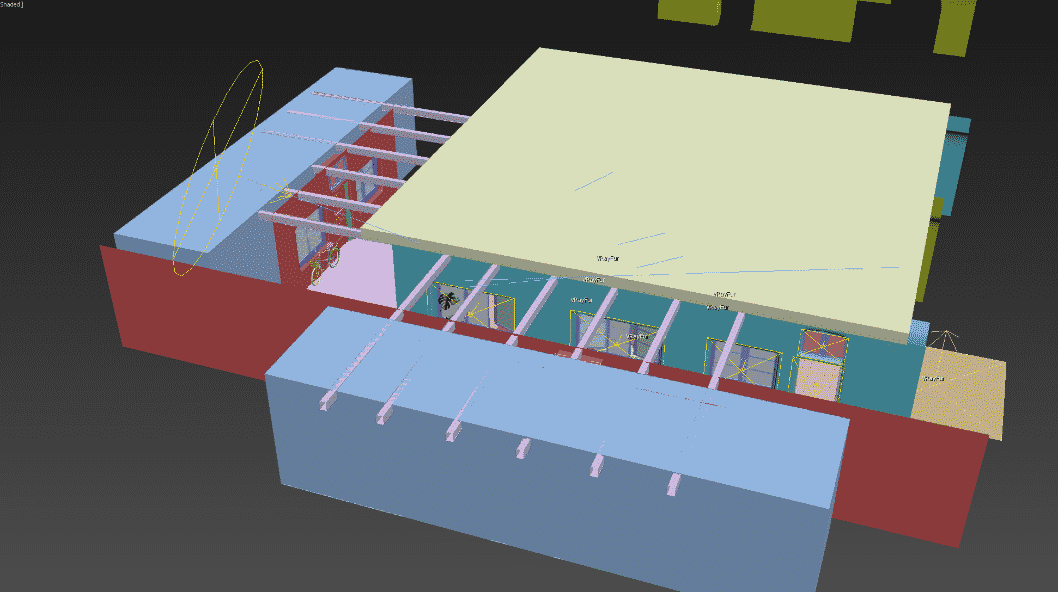
I always start by blocking the space to find the composition in real-world scale. Render engines like VRay are designed to bounce light in a physically-based way. So if you build a “house for ants,” the lighting calculations can be off. If you are trying to be accurate, you can always search the web for chair/table heights for dining and living rooms, kitchen cabinet sizes, etc. to help achieve this aim.
Placing a 3D human in the scene also helps me get the feel of the space just right. From there I generally add the walls, window punch-outs, doors, overhead beams, as well as any large objects or features that will shape the composition. For the flooring, I use either Floor Generator in conjunction with a Multi-Texture node by CG-Source or one of Substance Source’s high res floor textures. Next, I like to model larger pieces or pieces of furniture like the chandelier, side tables, window frames and doors. In this case, I filled in the rest of the scene with models from Evermotion and CGAxis.
Using premade models speeds up the creative process and helps it look lived-in a lot quicker. The downside to using pre-modeled assets is sometimes the finishes can clash with the style you are trying to achieve. However, a lot of the time the models are UV’d which makes them extremely easy to move over into Substance Painter for a custom texturing or outfit quickly with Source.
The Substance Workflow in Practice
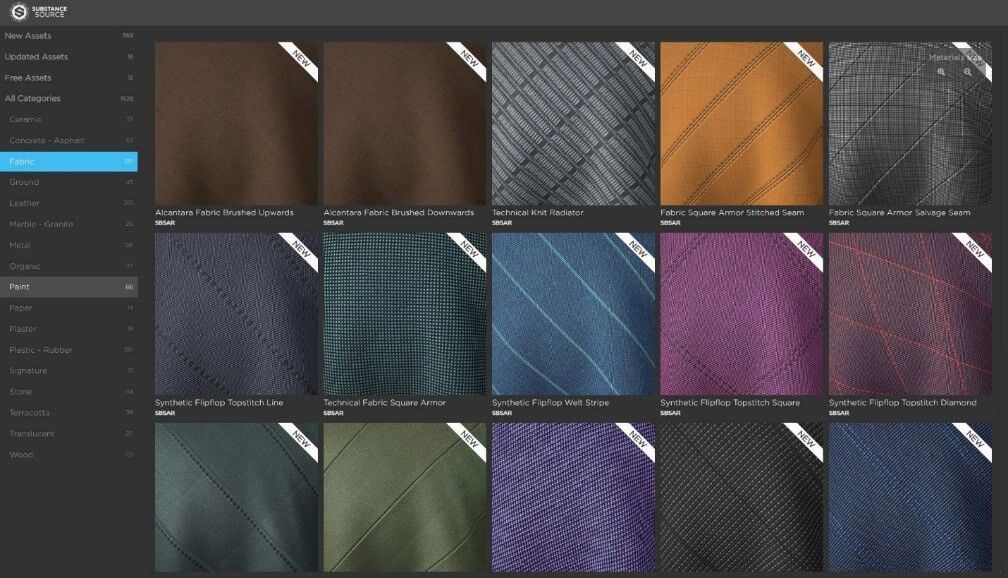
Creating materials: here is where the fun starts! I started with all the cloth materials for all of my couches, pillows, and blankets as they are most straightforward to create. I’m not going to lie; this was all handled by using stock Substance Source materials. There is so much detail in their cloth materials that all I needed to do was drag and drop them into my models. If you have 3ds Max 2018-2019, you could do this right in the viewport and not even have to leave Max with Allegorthimic’s 3ds Max plugin.
Now, remember, the couches were pre-made models, so the UV’s were ready to go which means I was done texturing them in minutes. The hard part is choosing from one of the 351 fabrics. What is incredible is that some of the fabrics have pattern variations embedded into the cloth material, which made finding patterns and colors that matched my scene very easy.


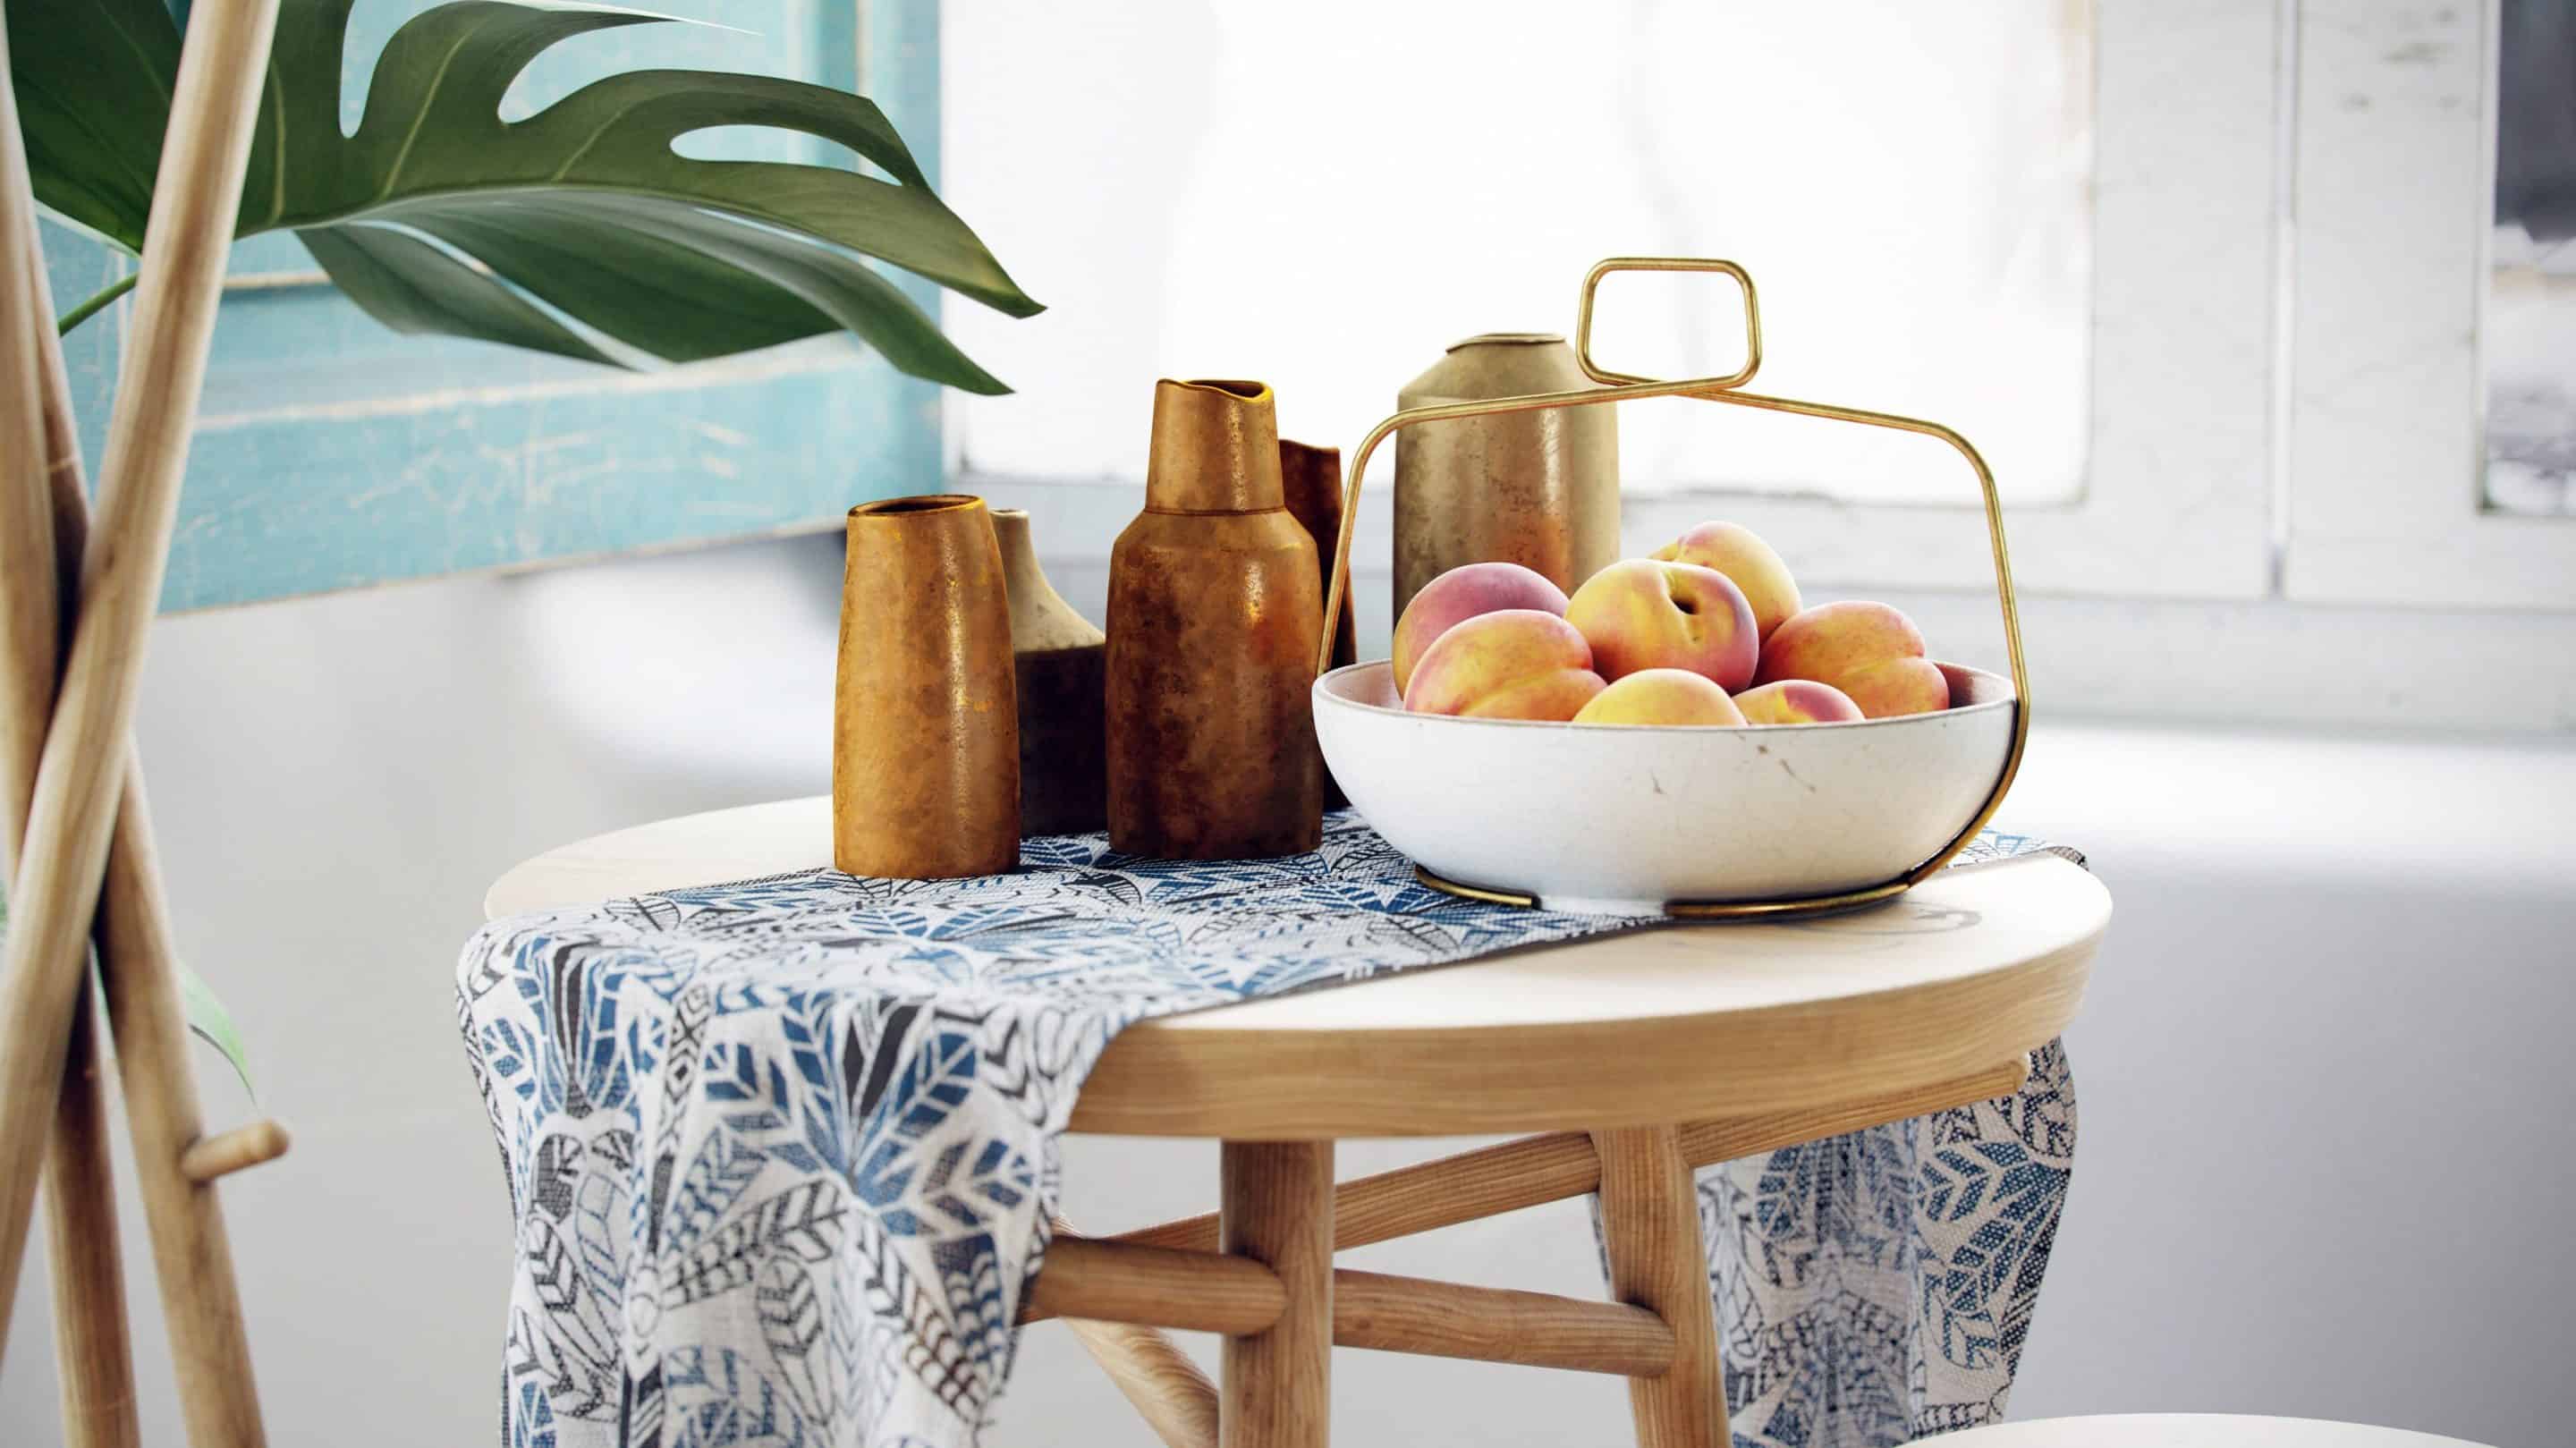
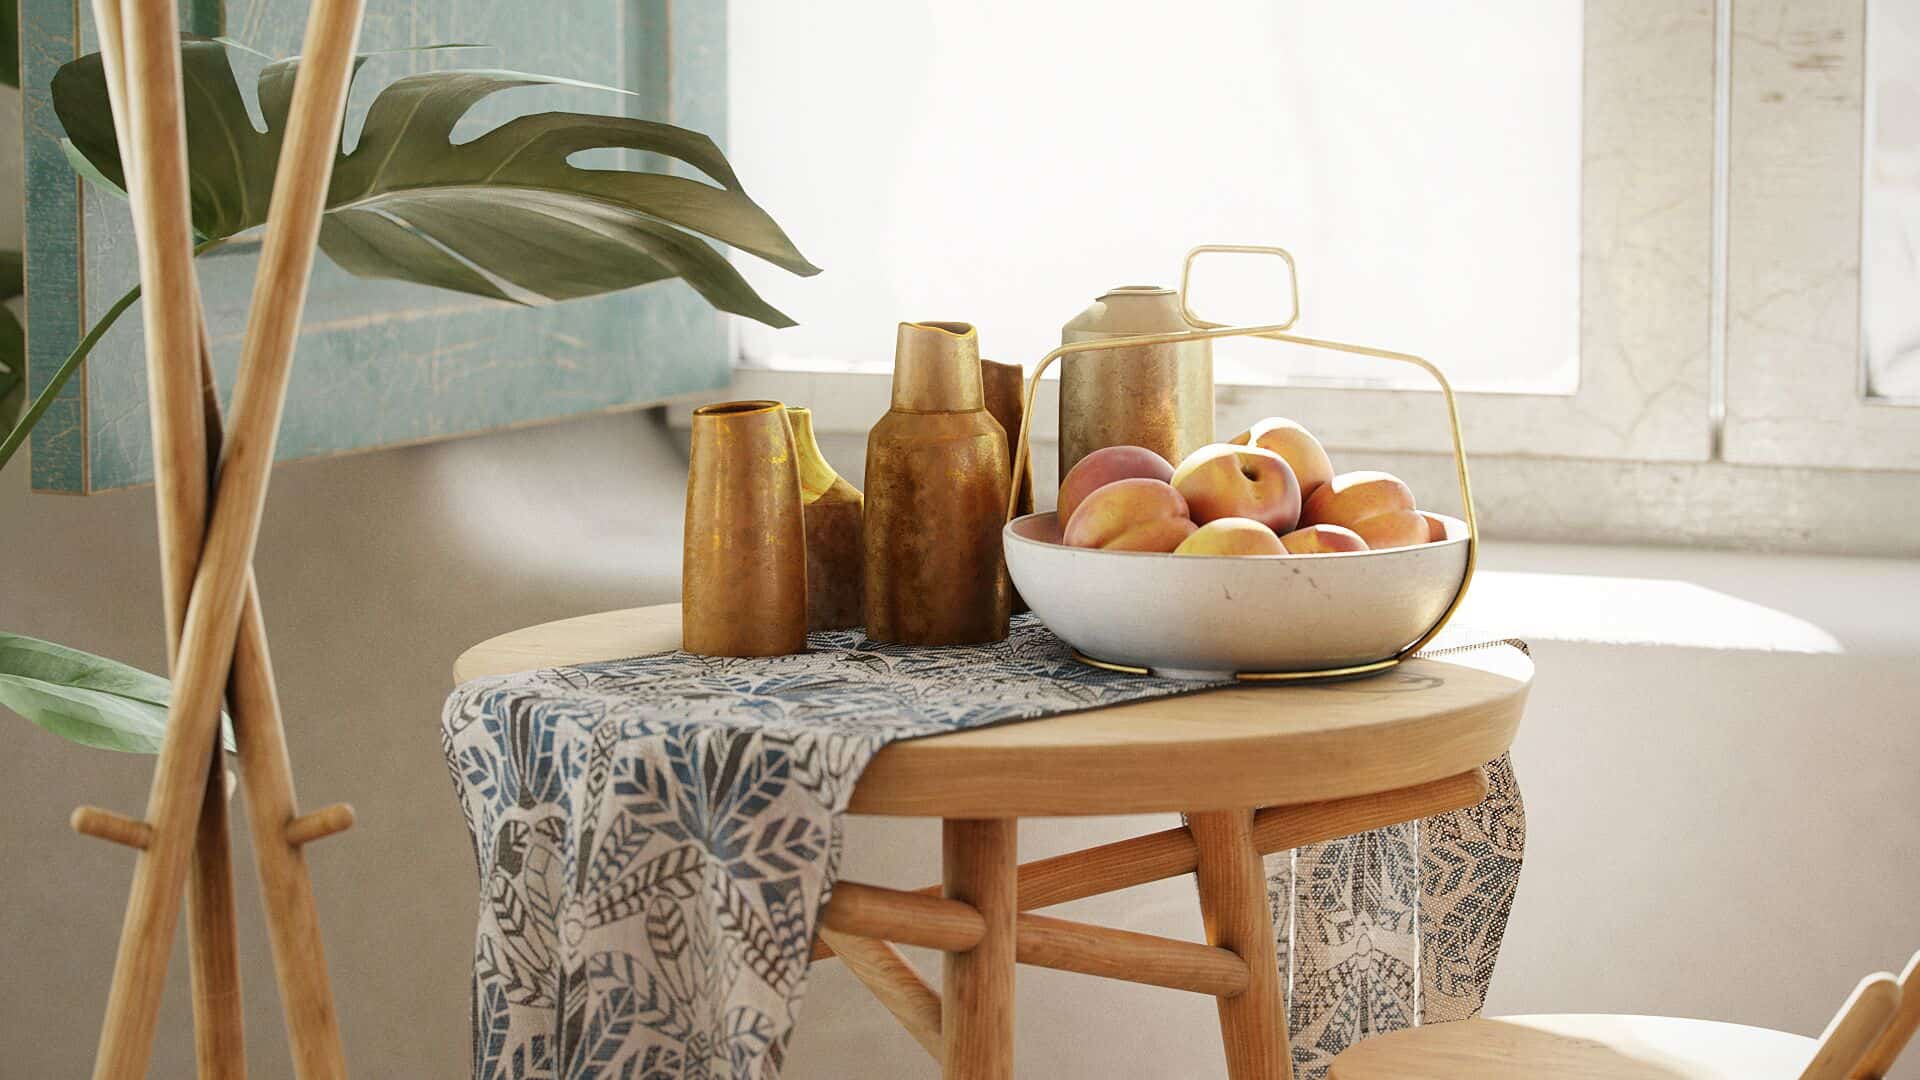
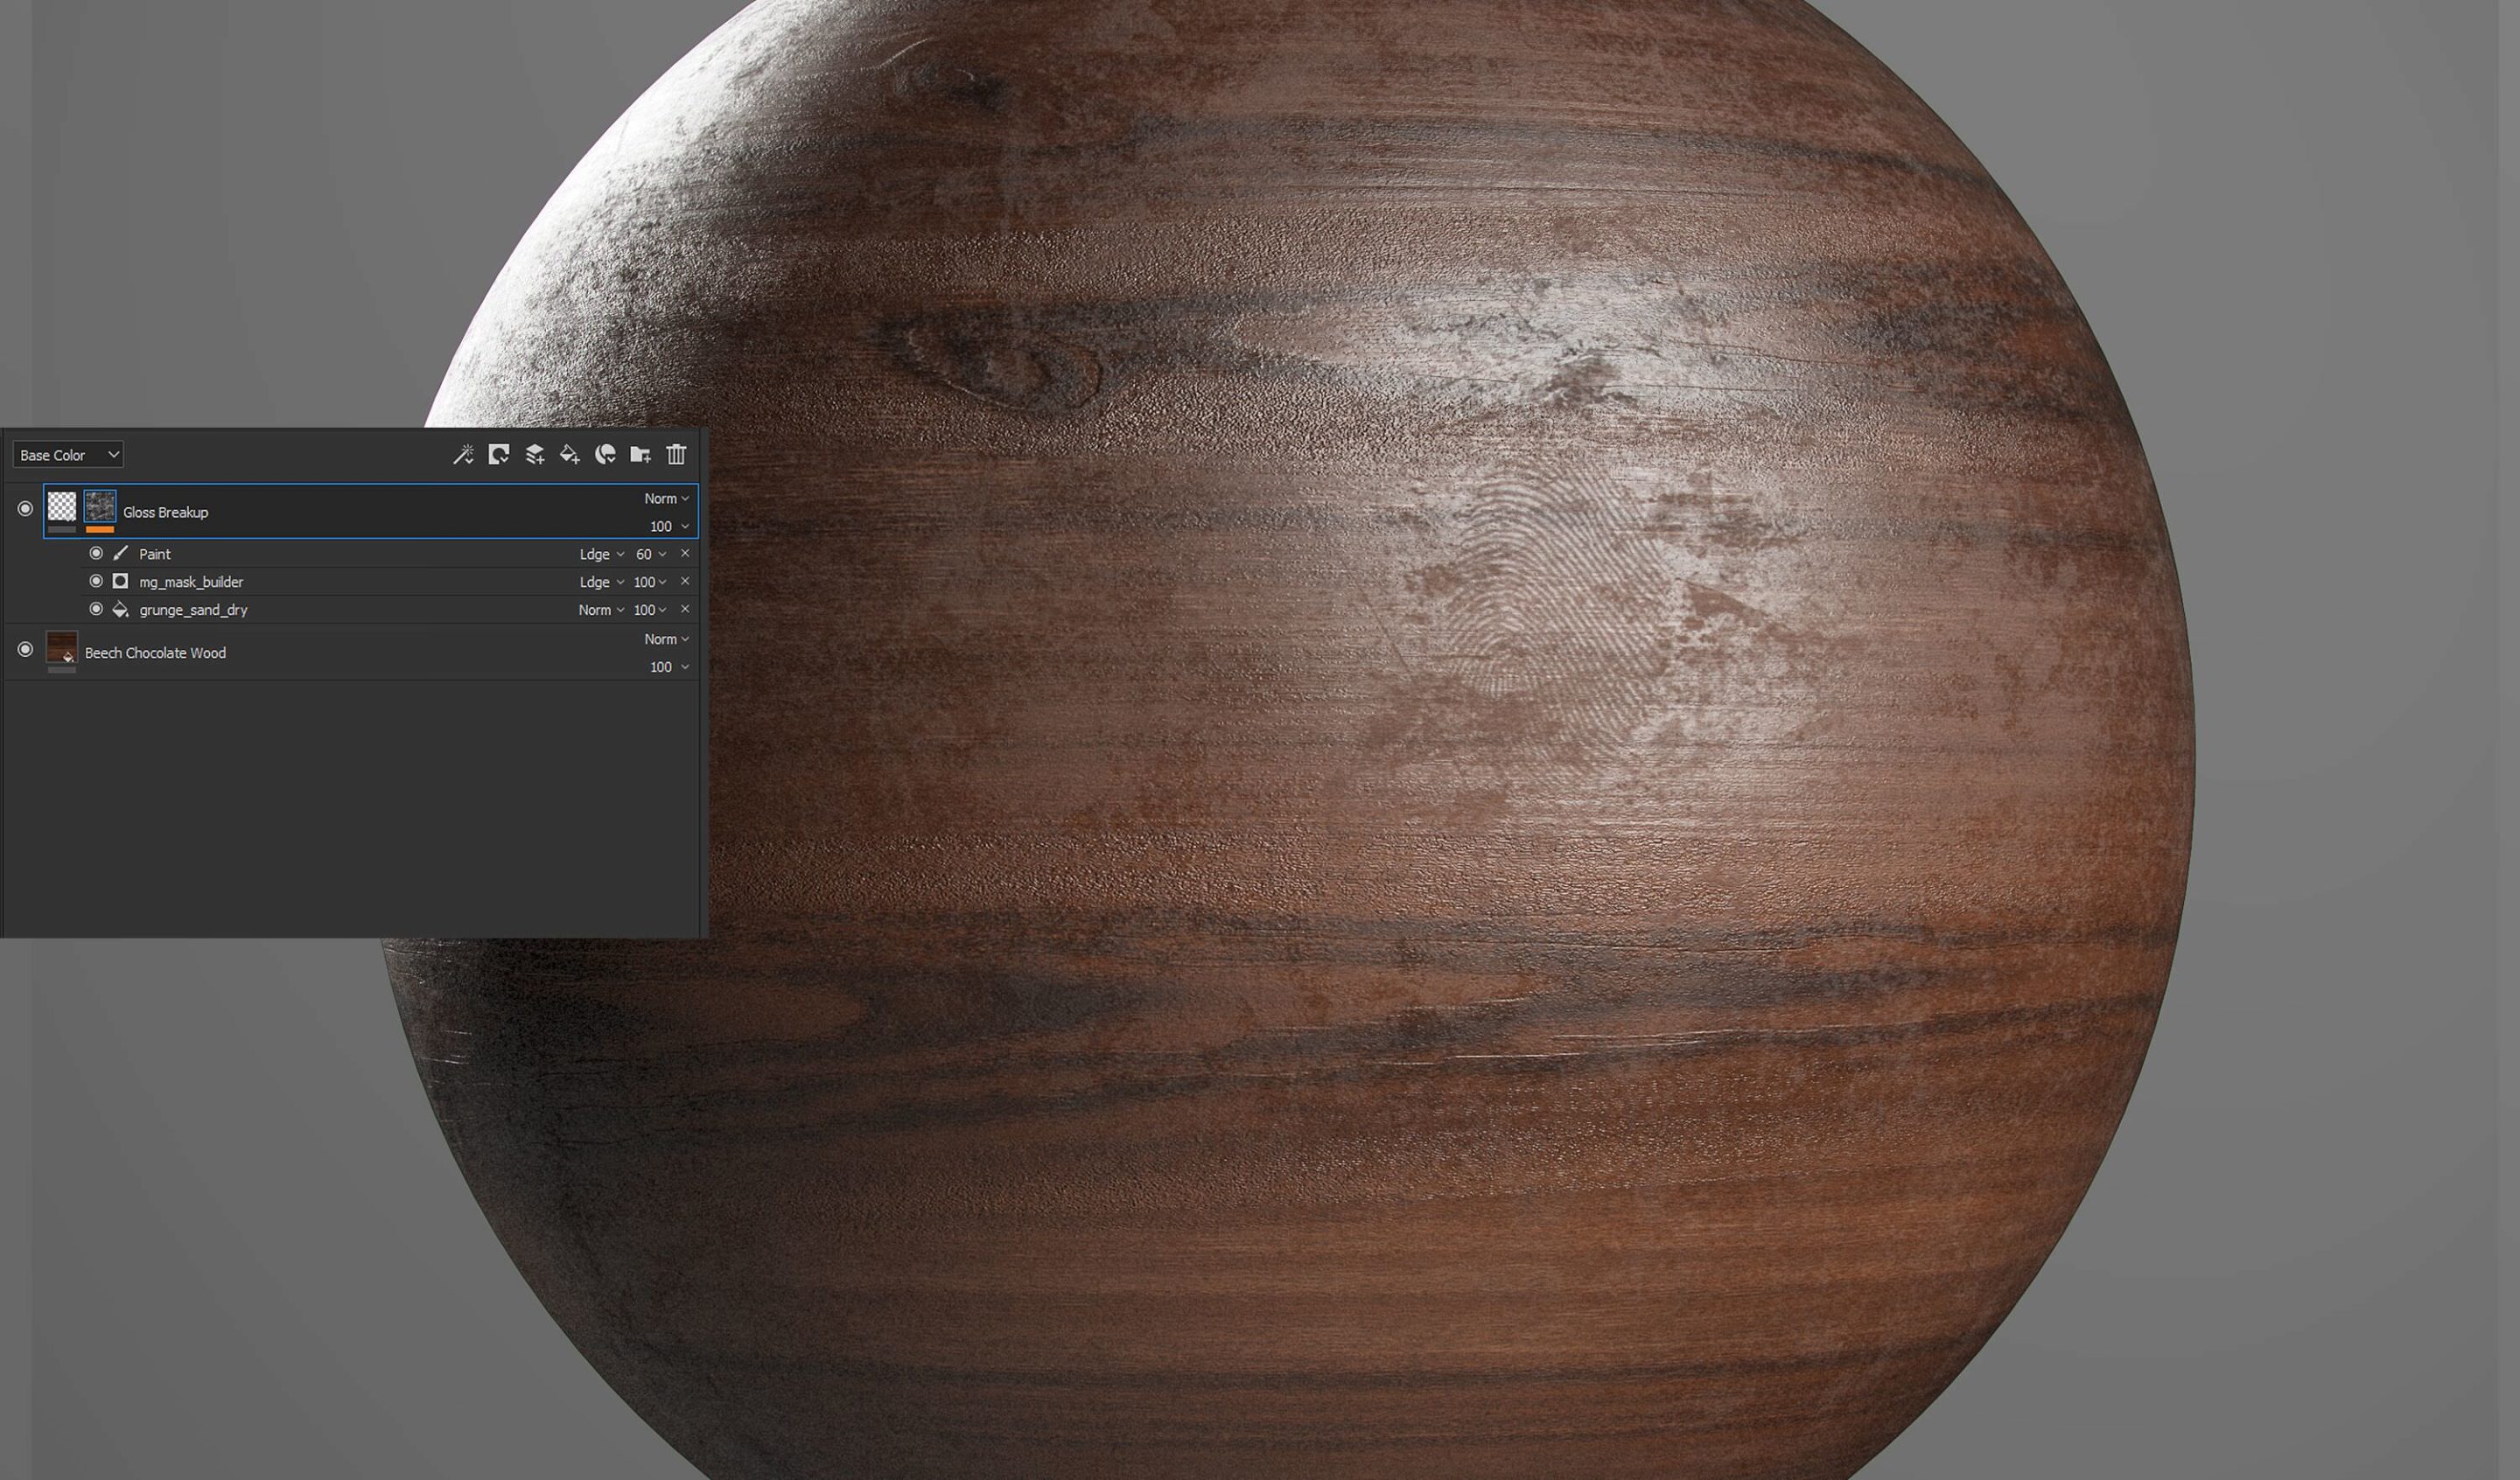
The next material I needed was nice wood texture. So I searched Source, which has over 100+ woods to choose from. I found and liked Beech Chocolate Wood. However, it was a little too clean for the rustic feeling I wanted so I needed to add a little more variation to make it look a little more worn.
In Substance Painter, I dropped the Source material onto the wood beam I exported from my scene. Again, a stock material can be used and look great, but I wanted to add more detail. In this case, all I needed to do was add some roughness variation, tweak the height intensity, add some small scratches and it was ready to export. All the variation below was achieved in two layers. I try not to go too overboard with these variations, just enough to break up the cleanliness of the material.

The next challenge was to apply this same material to a few different objects while maintaining textural uniqueness from model to model. I am not a huge fan of fully tileable textures, which is something we can do with Substance Painter, because we miss out on what makes Painter great, its ability to read your mesh and add custom variations to that specific model. To keep congruency between models, I saved this wood material out as a smart material. This can be done by grouping your entire layer stack within a folder, right-clicking on the folder and left-clicking “Create Smart Material.” Once you do that, you can open another model and drag this Smart Material onto another object. It will look similar, and you can adjust the material to whatever geometry that it was applied to encourage uniqueness. This makes moving materials from object to object so easy. These Smart Materials came in handy when creating cohesive yet unique textures for my ceiling support beams and the 6 window frames. Once a smart material is created, you can open up another model, drag the smart material onto the mesh to apply it, and you are ready to export.
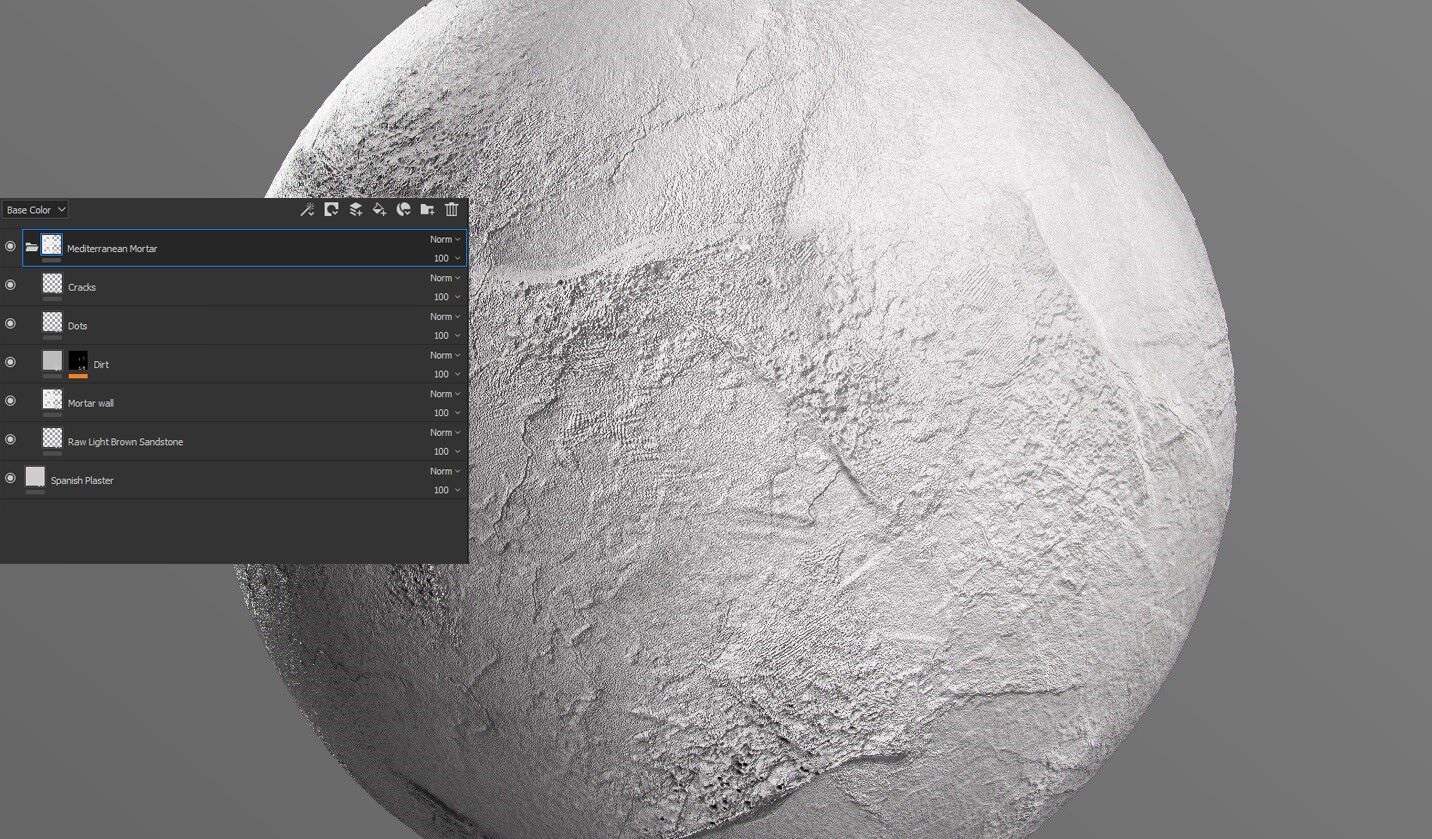
The last big texture in the scene was the mortar walls. I started searching for base material and found Spanish Plaster, but as always, I like to push my materials further. So I searched Source for another material I could lay over this one to give it some Normal variation so it wouldn’t be so smooth. I had found Raw Light Brown Sandstone. By layering Sandstone Raw’s normal over Spanish Plaster, it gave it that much more detail. However, still, it was too clean. There was no dirt or dust up in cracks. So I added another fill layer, made it a dirt color and used a generator to add the grunge and some Ambient Occlusion (AO) buildup of grime. Again, this is pretty subtle. Most people would not look and say “That wall looks dirty”; but it’s these subconscious cues that help trick minds to believe our renders are real. Lastly, I wanted some small cracks, so I created another layer, lowered the height value, added a black mask and a fill effect with a procedural cracks map to it and adjusted it to my liking. Overall, I was able to achieve loads of micro-details that keep the walls from looking directly plain white and unrealistically smooth. With Substance Painter, it’s incredible how much control I have over displacement and normal. I no longer have to try and create that kind of detail in a sculpting package like ZBrush.
By the way, if you’d like even more information on my workflow in Substance Painter, I taught a class for Pluralsight this year called “Shading and Texturing Interior Architecture with Substance Painter and VRay for 3ds Max.” It can be found here.
Lighting
Lighting with VRay is pretty simple. For daytime renders I generally always use a dome light with an HDRI in the texture slot, a VRaySun and some sky portals in the windows to help out with the Global Illumination (GI) calculations. If you are running VRay Next, you can use their Adaptive Dome Light feature and not add the sky portals. I found an excellent 3ds Max script on Script Spot named “Find and Bind.” The script aligns a VRaySun to the sun in an HDRI, and parents it all together so you can rotate the dome light and take the HDRI and VRaySun with it. Having a one-click solution for your exterior light is excellent. So that’s my lighting setup. It’s pretty simple.
Rendering
First things first, with scenes like this that have loads of detail, I will always render at 4K, minimum. There is no sense in creating 4K and 8K texture maps if one is going to render in 1080. I also now use VRay’s Metal/Roughness workflow for materials if gets me closer to achieving the look I am getting in Substance Painter. See the screenshot of the material editor for instructions on how to set up a material using Metal/Roughness.

Next, under Global Switches, if I have metals in the scene, I set the Max Ray Intensity to 9.0. This helps remove “fireflies” in my renders. For interiors, I always go with Irradiance Map as the Primary Engine and Light Cache as the Secondary Engine. I was initially taught that you don’t need to turn the Irradiance Map (IM) quality past Low, but have learned later in my 3D career that there is a lot of missed information when the Max Rate for the Irradiance Map is below 0. So I now run my final renders on High for that setting. I also sometimes turn up my subdivisions to 60-70 to help gain more definition in those GI shadowing effects. I’ve found that in Light Cache settings, when Store Direct Light is checked, the lighting doesn’t feel as realistic as when its checked off. So if I need a quick turnaround, I leave it checked by default because when it’s on, it renders a little faster. However, if I want a nice render, I uncheck it.
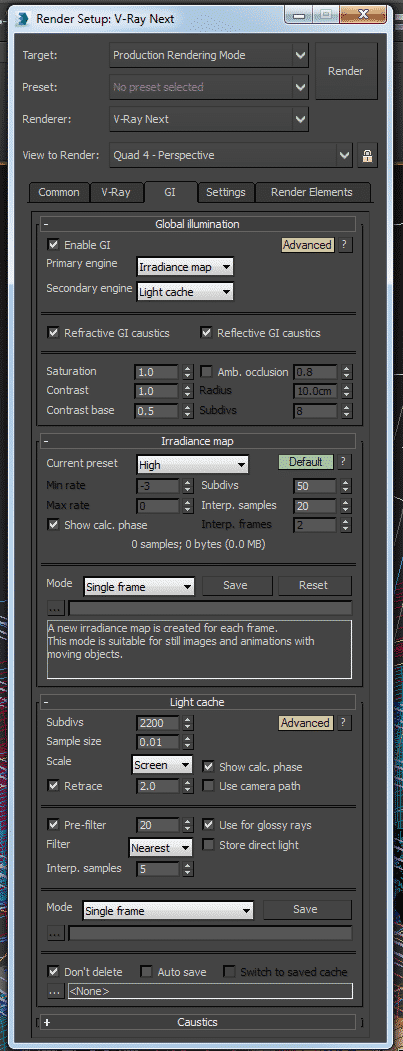
Lastly, for color mapping, I tend to stick with Exponential, and if the sun is blowing out a little too much, I’ll use Reinhard. I like to balance the lighting between the HDRI and the VRaySun but starting with the dome light. Then once those lighting levels are at the desired amount, I start dialing the VRaySun values you. In this render, my sun’s intensity is at 0.05, but it was still a little too blown out on the flooring, so I switched over the Reinhard from Exponential and reduced the Burn Value to 0.2. This helped even out the lighting from the interior and exterior.
Last but not least, I’ve got to have my render passes. Things like atmosphere, diffuse, lighting, reflection, refraction, VRayExtraTex with a VRayDirt node in it, wire color passes, all this stuff gives us loads of control if I need to change things during post-production (i.e., Photoshop or After Effects). When working quickly for clients, I rely more on these because I do not have the time to make the changes in 3D and re-render. Alternatively, if the client changes their mind about something after rendering, sometimes it just more comfortable and quicker to make the changes in Photoshop. In this case, I had all the time in the world to adjust to the scene, so I relied on the passes a lot less.
Post-Production
Post-production is laborious to give direction on because this is where one’s artistic eye shines through. Generally, in post-production, I load up all my render passes in Photoshop with the “Load Files Into Stack” script that is native to Photoshop. From there, I add my lighting and GI passes in on Screen or Linear Burn (add) blend modes. Whichever is more pleasing to the eye. Then I move to reflections, refractions, and secular passes on screen blending mode and adjust the opacity to where I like it. You can also set your reflection or specular passes to Subtract if you want to remove overpowering reflections. From there I turn on my VRayDirt pass on Linear Burn and adjust opacity. I generally keep that 50% or below. I tend to use this more sparingly as too much can make the render look CG. Then I merge all the passes into one and add a curves adjustment above that. I then add some vignette and chromatic aberration through the Lens Correction option in Photoshop. Lastly, I finish it off with an Unshapen Mask with the amount around 50-75 and my radius of 1 pixel.
Final Comments
With all the advancement that Allegorithmic has made with Substance Source, Painter, and even Designer, it is amazingly quick and easy for me as an artist to create custom texture maps for all my assets. Also, Substance Source has TONS of scanned materials that are ready to render that you can drag and drop onto your model. I did not need to be technically savvy to figure out how to harness the full potential of Source. However, I am an artist that likes to do my creative thing with custom textures, and that is where Painter comes in. It allows me to be creative very quickly.
If you’d like to take my course in texturing assets for architectural visualizations, you can find my class on Pluralsight. You can use this link for a free 10-day trial!
Additional Renders