Modern Barn in UE4

Hello everyone! :grinning:

I’ve been working on this archviz project during my free time in the last couple of months. It is growing more than I expected and I’m learning a lot during the process. I’ll be sharing it here and maybe I can help others that are going down the same path :grin:

The architects want a video of one of their finished projects for their portfolio. As the timeline wasn’t so strict this time, I figured it would be a great opportunity to invest some extra time and improve my techniques in UE4. It is my first interior + exterior project in this engine.

The architectural project:
A modern barn style country house. The construction of the real building has not started yet.

Source material for the archviz:
A very poorly done SketchUp viz and a DWG blueprints.

I thught the SketchUp model could spare me work but it had so many broken and messed up meshes that I decided to remodel everything from scratch.

I didn’t have the exact location of the land, but I knew the region where it should be. It was enough for me to get some satellite imagery references to help with the environment design.

Process
I always start with two different UE4 projects for exterior archviz.

One for the environment and another for the house itself (and some land around it). The merging process is as easy as migrating the house as a sublevel to the environment project.
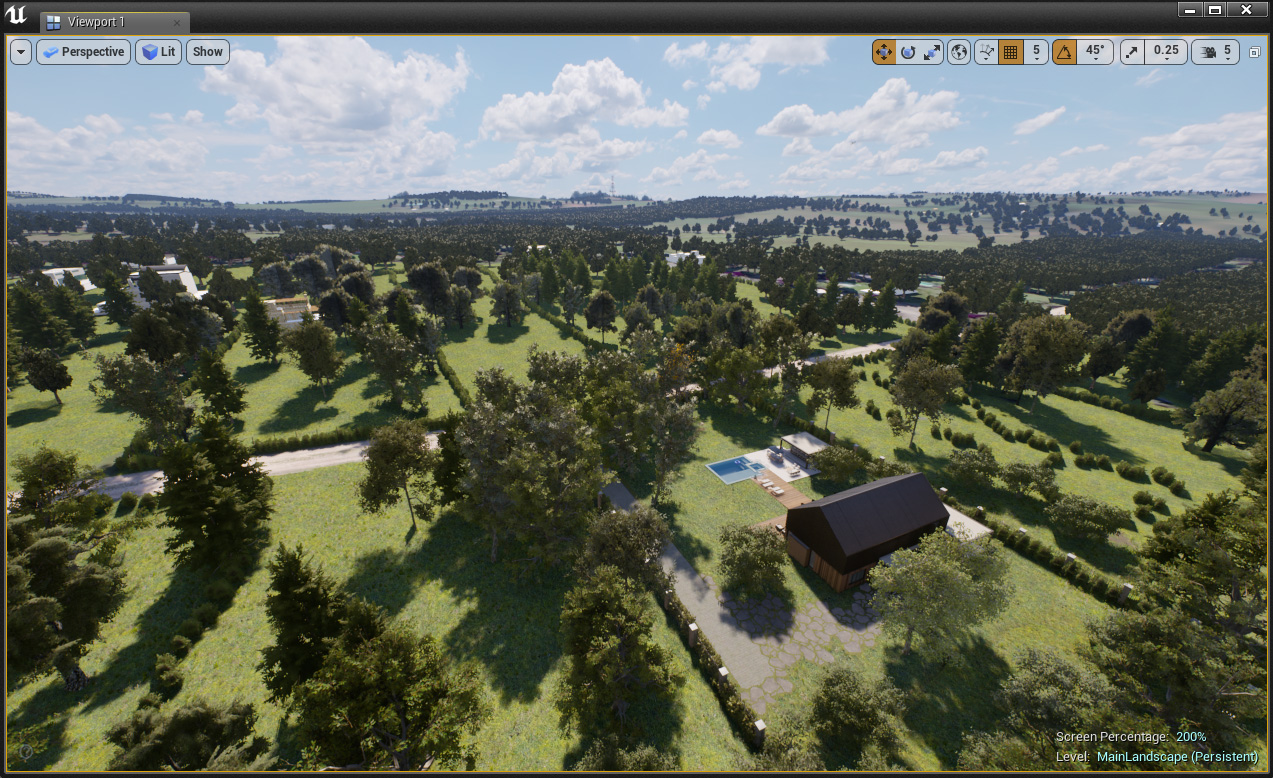
The environment
The most enjoyable part of the job in my opinion. :evergreen_tree::evergreen_tree::evergreen_tree:

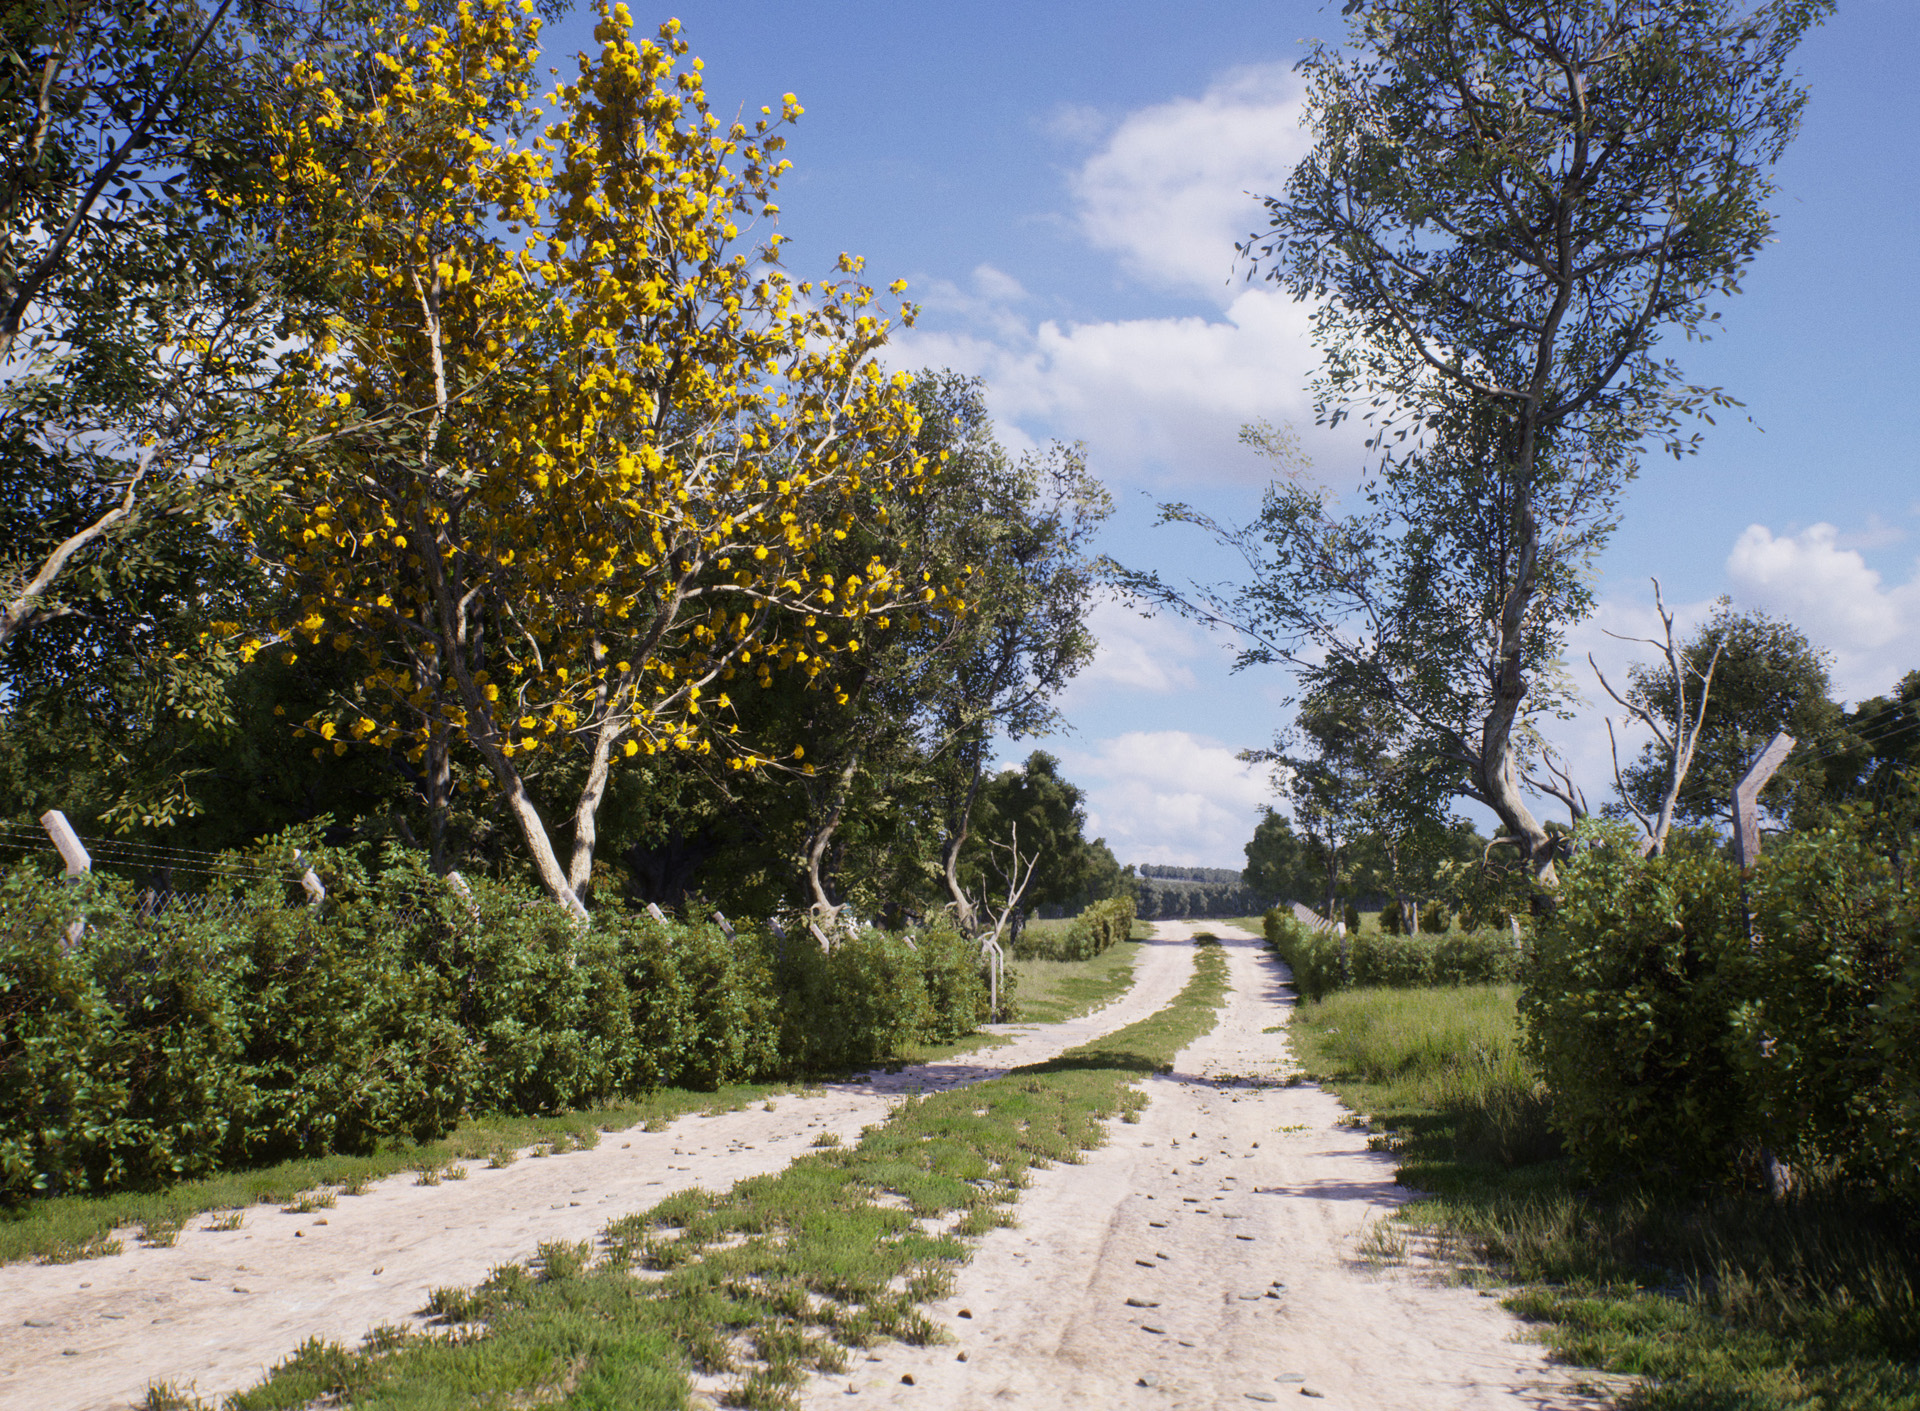
I always create my environments waaaay larger than they need to be. I don’t need aerial views of this project or detailed neighborhood. But I’ve used real information of terrain from a 10x10 Km area around the house and satellite imagery for precise vegetation and road placement all around. That way I get precise horizon views, great environment material for future projects and it’s also a good way to learn about UE4 landscape tools.

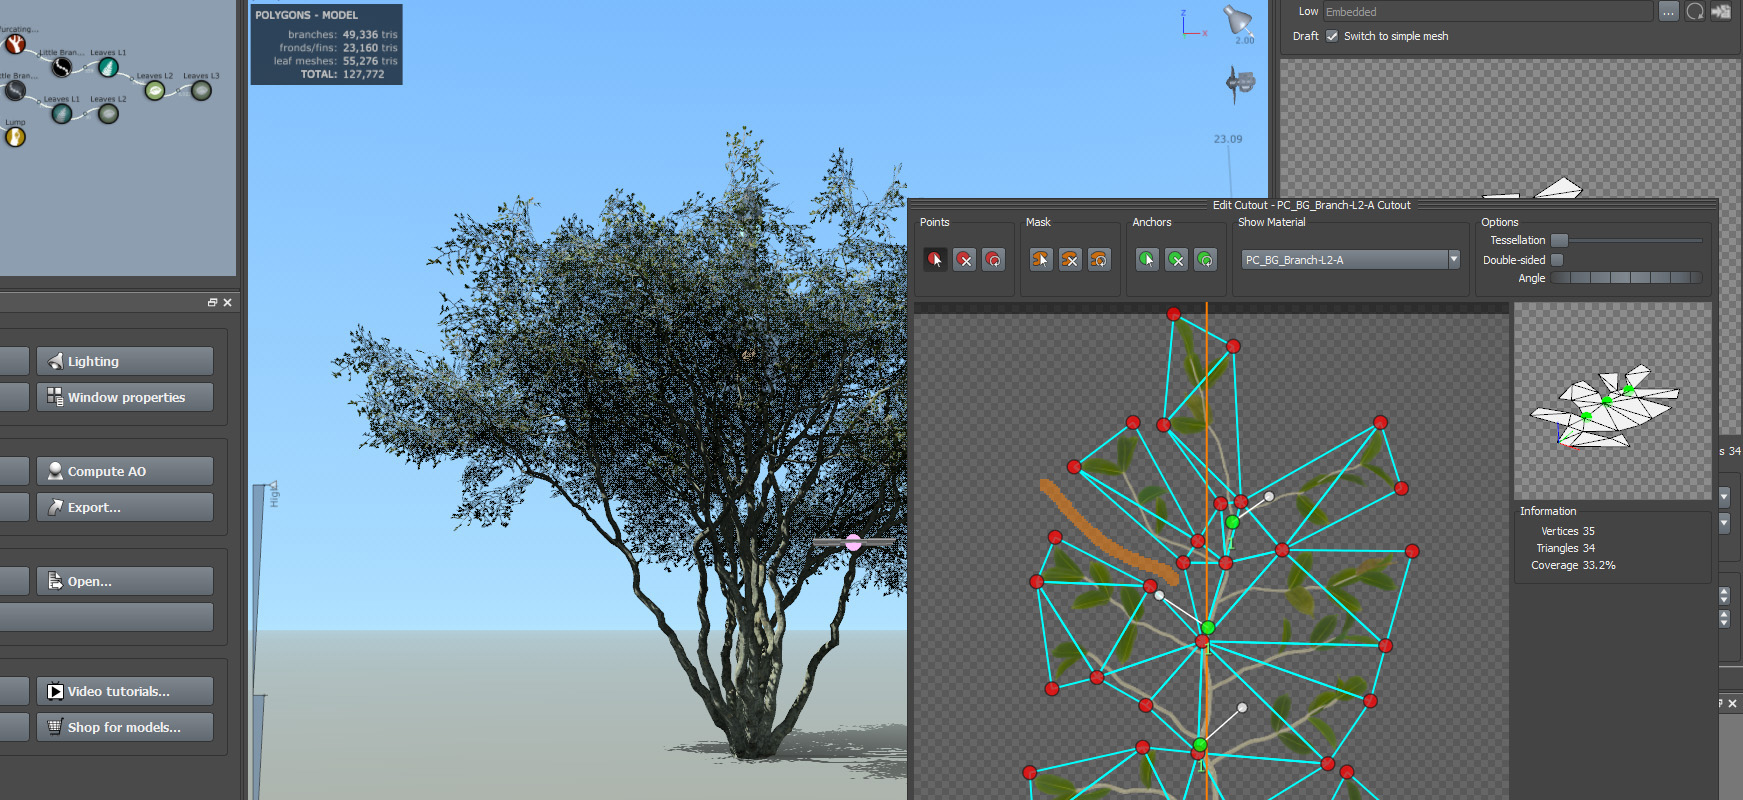
Good foliage is the key to a convincing natural environment and that’s a real issue when we talk real-time rendering. In my case, it’s also dense enough to eliminate static light from its viable lighting possibilities. I use SpeedTree to create and optimize all my foliage. ST8 has now a mesh creation tool that completely eliminates the need for a 3D modeling software to create custom meshes for decent atlases. Now it’s way easier to reduce overdrawing issues in ST assets. Just get a couple of leaf atlases and bark textures from a good texture website (I like Megascans and Poliigon) and you’re all set to create realistic and optimized trees :facepunch:

Performance
This project won’t require an interactive application for the client, so I’m not worrying too much about optimization [yet]. :stuck_out_tongue:

I like to keep a 1080p 40fps target (for my work machine - gtx 1070). That way I can limit the viewport framerate at 20~30fps and keep my PC running cool. And I also get some gap so I can improve shadow quality and resolution if I need.

Lighting and Post Process
By far the most laborious stage of my archviz workflow in UE4. :sweat:

Unreal Engine adopts a “sort-of-physically-based-lighting-but-not-quite-there-yet” system that ends up translating into a huge eyeballing party. So if you expect to rely on logic to set up a photorealistic lighting like you’d do in some offline renders out there, forget it. The light units are a mess and their relationship with the camera exposure controls doesn’t make any sense (which is very frustrating if you practice photography). The situation is even worse when you need to combine both static and dynamic lighting together. There is a topic in Epic’s forum where this issue is deeply discussed: https://forums.unrealengine.com/development-discussion/rendering/1414326-4-19-physical-lights

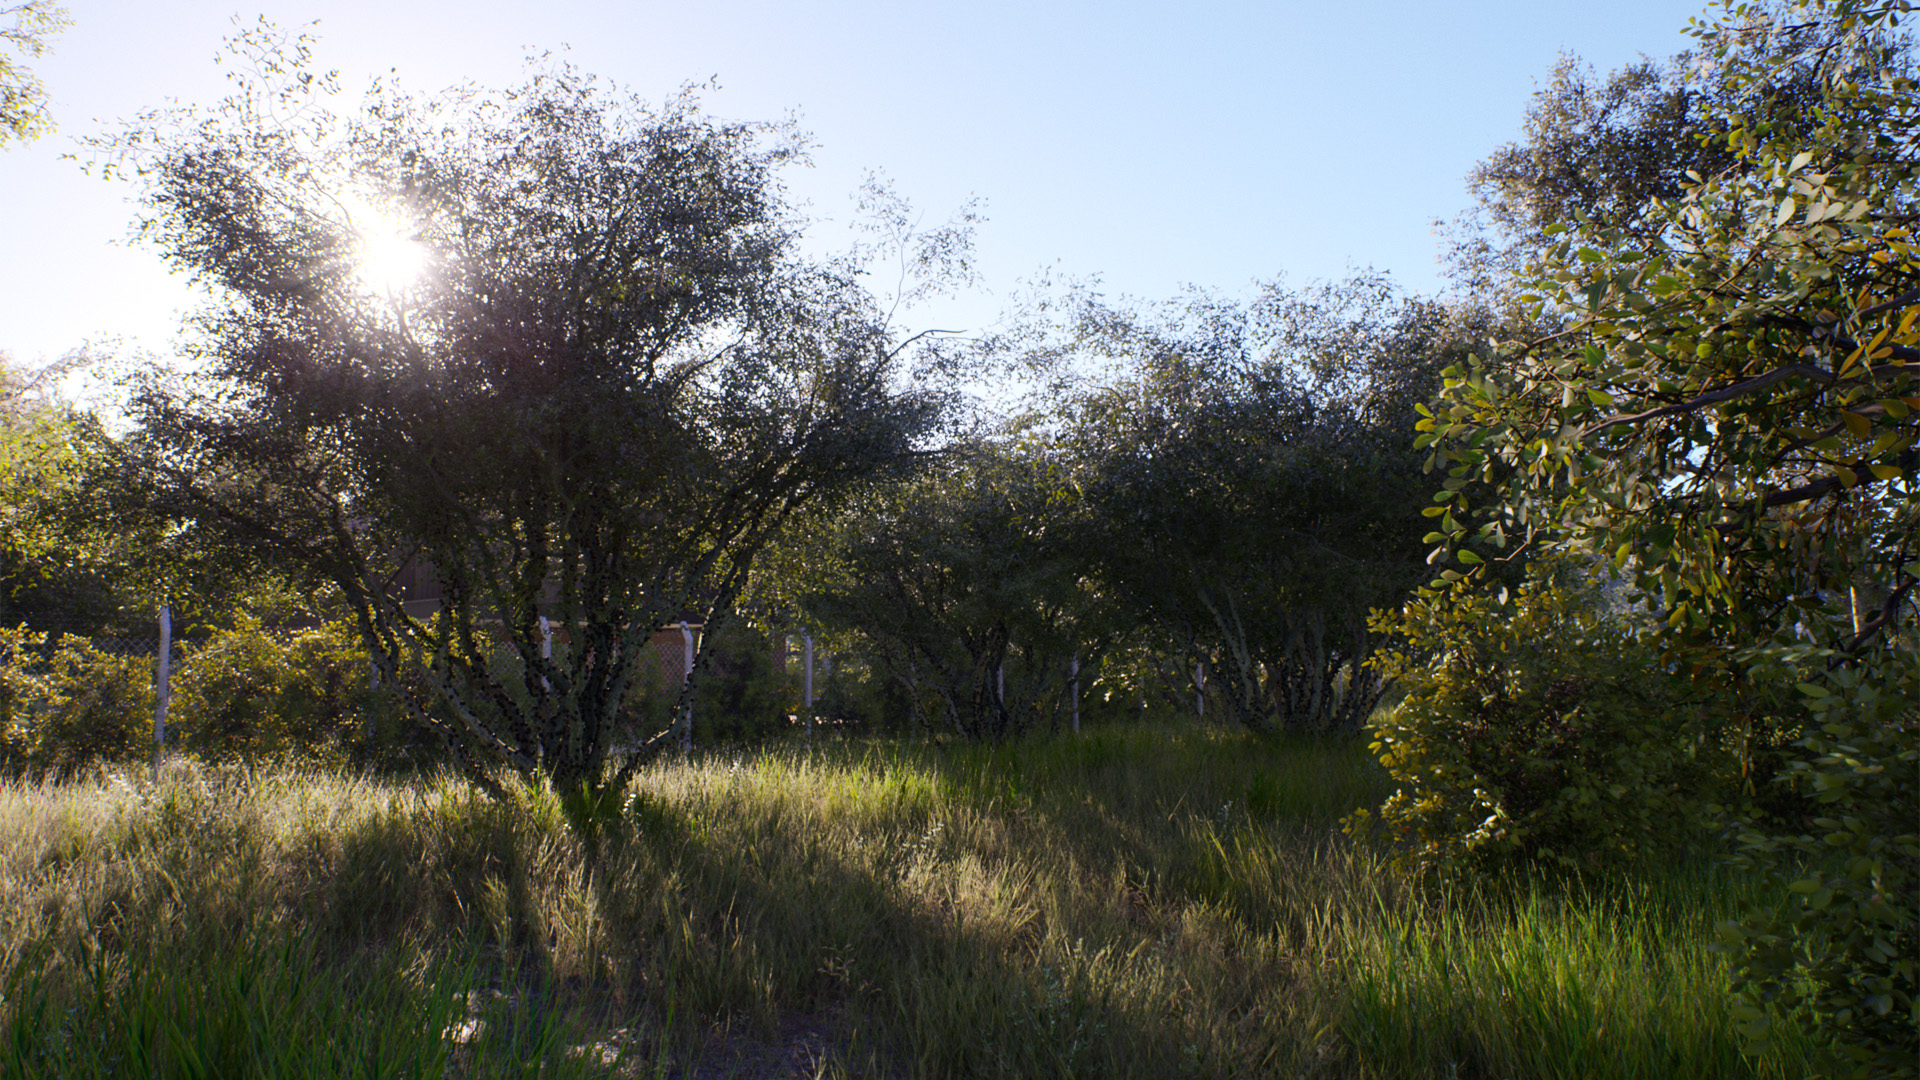
But I won’t deny that is even more rewarding to achieve the results you want when it’s not so easy to do so. :stuck_out_tongue_closed_eyes: Anyway, my workflow here is to take a bunch of raw pictures of environments and lighting conditions and use them as a reference to tweak light, materials (diffuse brightness and AO) and post process in UE4. Even if I work on a project during my free time, I’m kinda 24/7 tuned on that. I’m going to work or having lunch and I’m constantly observing my surroundings looking for references to what I want to recreate. With some practice, you start achieving good results quite fast. But if you decide to change the lighting conditions a little bit you’ll instantly feel the pain of a weak physical lighting system… You’ll need to tweak all the parameters again because the last setup won’t work anymore. :sob:


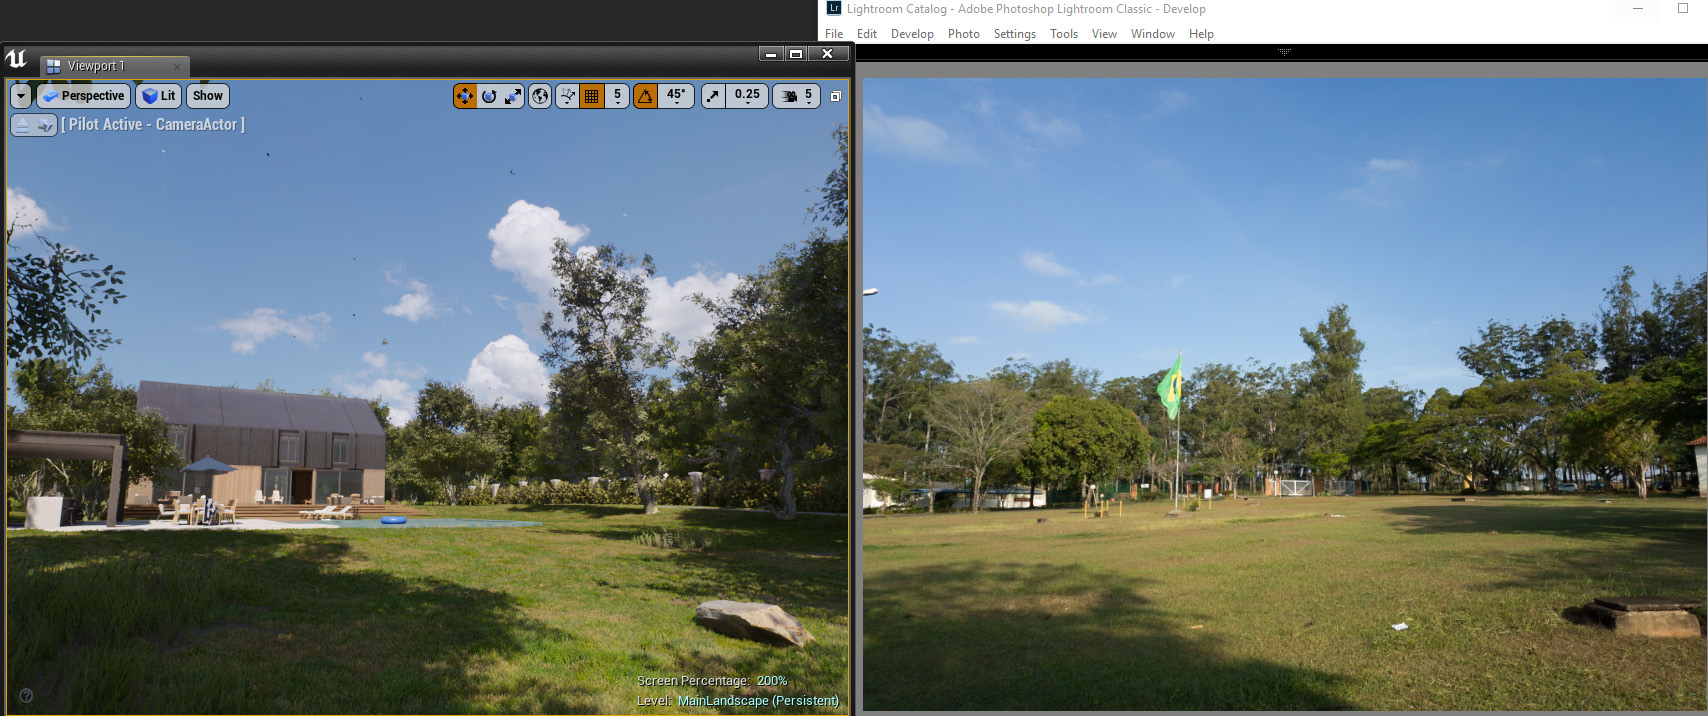
using real references to tweak light and materials

That’s the main reason why I don’t like to show light settings to people. Those settings change every time for every situation. You need to understand how the parameters are influencing the results (even if it’s in a crazy way) to get good results and that requires a lot of practice and trial and errors.
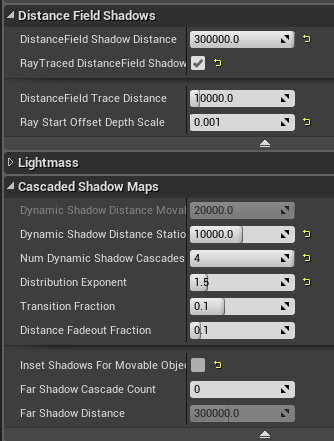
The basic setup is:

  • Stationary Sunlight + Stationary Skylight + Exponential Height Fog (for better horizon) + Dome with sky texture so the skylight can grab some color from it.
  • Lightmass settings: Ultra settings + Level Scale 0.3 + Indirect Quality 4
  • Lots of material brightness and saturation tweaking until I achieve the balance I need for the overall looking in the scene.

ps: that scene takes 12h to bake lightmaps in a i7 7700 + 16gb RAM. That amount of RAM is not enough by the way. My system is doing a lot of memory cashing and that’s certainly slowing down the light building process.

CGArchitect 2018 Architectural 3D Awards + Optimization

A friend of mine came to me a week ago like “man, you must enter this award!”.

I’ll be sincere… I don’t like to participate of those contests because I feel so compelled to do my best that I forget everything else in my life (who needs to sleep anyway? :stuck_out_tongue_closed_eyes:). Anyway, I had this project going on so I thought it would be a great opportunity to conform it for an entry.

I changed my priorities during last week and focused on creating a video footage. One of the rules was “it must be a real-time footage at 30fps or more”. So I started optimizing the project with a target of 2560x1440 30fps+. I can’t deny that I’ve learned a lot about optimization in UE4 because of that.

I had to remodel some of the old foliage assets to get tighter meshes (thus reducing overdrawing). I also merged a lot of small meshes together.

That’s the drawback of Datasmith…

It’s so quick and easy to import stuff with decent materials that you keep importing and importing assets. Suddenly you have an insane amount of single meshes (each one with probably a lot of sub-materials) and your draw calls are skyrocketing!

LODing is also important. UE4 has a great tool to create LOD very fast.

I didn’t sleep the night before the submission time limit and of course I would keep adding details and polishing the everything until the very last hour before submission period expired. :unamused: And I probably wasn’t the only one with that brilliant idea because their servers got overloaded and my upload kept getting stuck every time.:sob::sob: Anyway, I’ve submitted a couple of not-so-polished-pictures-as-I-wanted as a B plan and followed their instructions via e-mail to send the video. I didn’t get their confirmation yet but I hope I got a valid entry :pray::pray:

Not Finished Yet
This is still an ongoing project.

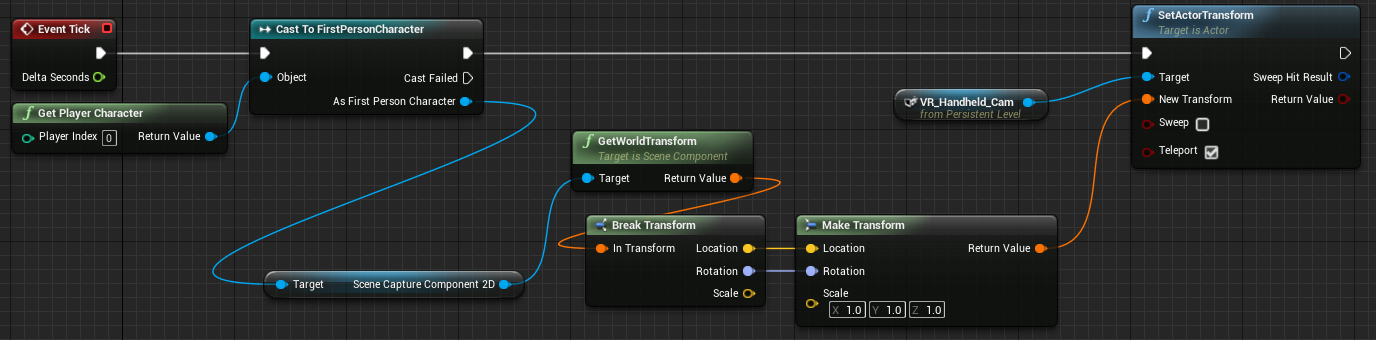
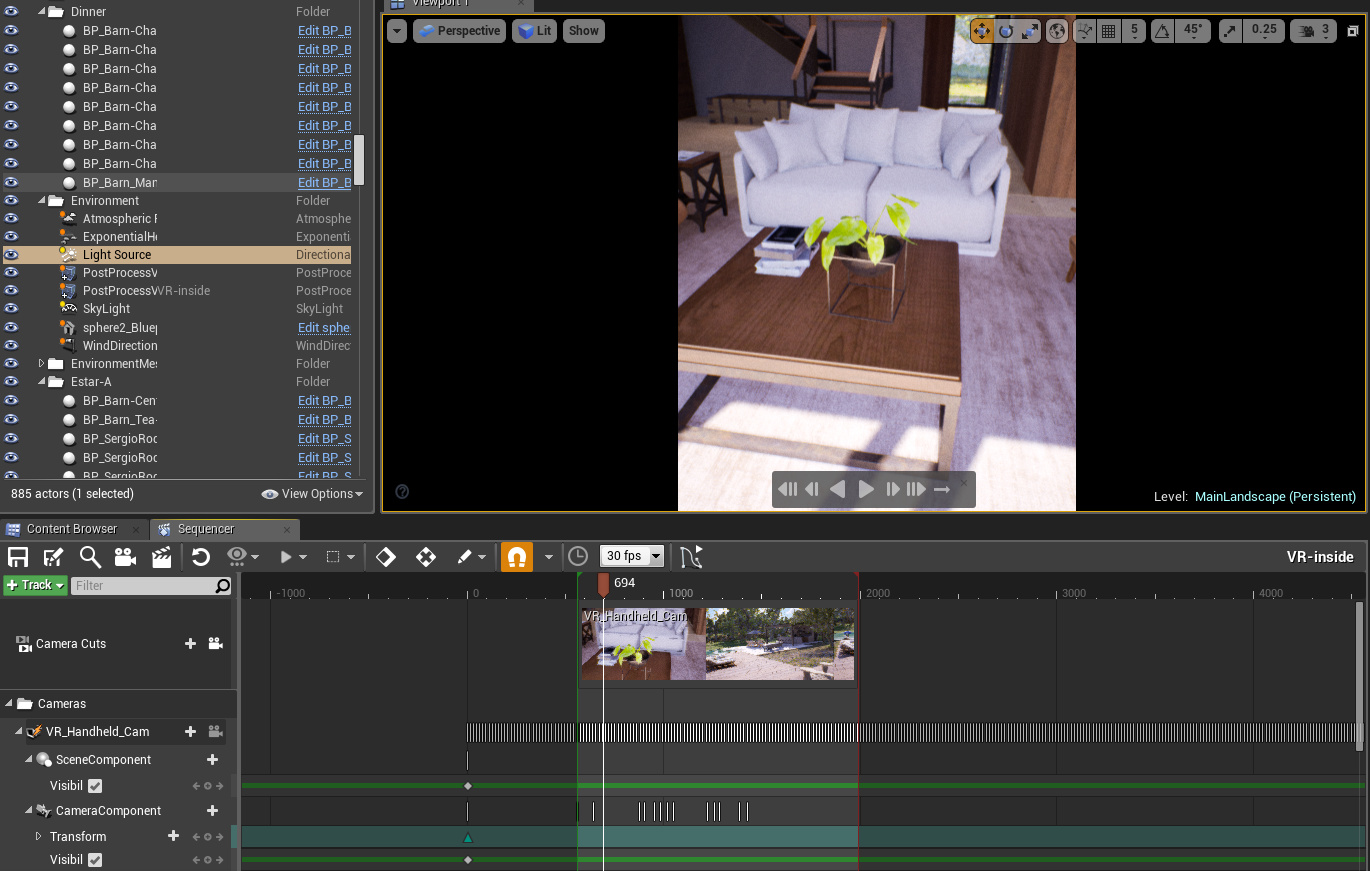
I’m starting to put a final footage together (not the same one I’ve sent to CGArchitect award) and I plan to experiment a little with VR hand tracking (to simulate some handheld footage). I’m also organizing that project in a way that I can make it compatible with a Cloud Gaming solution that I’m developing in my startup (Sureale), but that is a matter for another topic.

This is a short test video I’ve made a couple of weeks ago:

I’ll keep updating this thread with my advances in that project. I didn’t go too technical on any of the items above because otherwise, this topic would be even longer. Feel free to ask me about any specifics if you wish. C&C are always welcome too.

Take care!

4 Likes

Hi @rabellogp,

Welcome to Talk :slight_smile:

This is a super inspiring and informative post you made here! I’ve been following you since you first shared progress images and I must say this looks good. Very Good!

When you mention this…

What did you end up using for remodeling things? How was that better?

Can you elaborate on that a bit? Was it Google Earth or something else?

This kind of comment always translates to the number of hours I would expect “wasting” on figuring out the baseline to work with. I get the reverse relationship between frustration and how rewarding it is to get it right eventually… but how long was it for you?

The way you describe your experience is that there is no “real” baseline to find and adjust from.

12H to bake lightmaps!!! maybe this is normal :wink: How does that compare with a simple modern style interior scene? Just for reference…

Looking forward to learn more from you and see what others have to ask!

Cheers,

RB

1 Like

Super inspiring, welcome to talk.

I did use unreal engine once back then when it first became free. Back then we didn’t have much resources online therefore the learning curb was a bit steep. You did a very good job on this, so kudos!

How did you find the learning curb now? Anything to avoid for the new users that could help ease their life?

1 Like

I don’t like to use “awesome” a lot, but that’s probably the best description of your project, amazing job! I like how it stays realistic even on the test video. From what I’ve seen, most of the Unreal based projects start losing realism, when it comes to movement through the scene.
Looking forward to see final footage!

1 Like

Here’s a new “shaky” cam video @rabellogp posted on twitter

Looking forward seeing more insight about it here :wink:

1 Like

Thanks @ronen
About your questions:

Back to the old and good 3DS Max that I’ve been using for the last 15 years :laughing:

My goal was to import the Sketchup project in 3DS Max and do all the necessary preparations for later exporting it to Unreal. By “preparations” I mean subdivide or merge meshes together to get decent surface area for each object and generate proper UVs for lightmaps.

But that specific Skecthup model that I got was too messy. Lots of geometries with missing faces, walls and floors were not precisely placed (with gaps between them) etc… So I decided to remodel the house from scratch using the dwg blueprints as basis.

That is an interesting thing to note in Unreal workflow for archviz. You can easily get away with “bad geometry” in offline renders. Mainly if you’re going to show only a small part of it. But for real-time in Unreal you want the geometries as “perfect” as possible to avoid headaches in the next steps of the workflow. UV for lightmaps, lightmass calculations, performance, real-time shadows… All of that depends on the geometry somehow.

I like to use this website to find terrain data and download the heightmaps: http://terrain.party/
For the satellite imagery I use Google Earth.

Ok, let’s talk more about that because I think it is a major flaw in UE4.

I can say that my baseline is the default UE4 values. If you place a skylight and a sunlight in your scene their default values are 1 for the sky and 3.14 for the Sun. If I’m not mistaken, Epic says that that proportion will get you physically accurate sunny daylight intensities.

But you want a sky texture in your scene so you add a dome with a sky texture or a Atmospheric Fog actor. Now that skylight value of 1 only acts as a multiplier for the intensity of whatever it is grabbing light information from. Your sky intensity now depends on the HDR texture you’re using or the settings of your Atmospheric Fog actor or color of a third party sky blueprint…

And now you need to tweak the intensity of that skylight source to get the physically correct light. But how do you do that? You could use a table like the Sunny 16 rule as basis. But for that to work you’d need a physical camera system. You have one in UE4, but if you set its exposure parameters to match the Sunny 16 table you’ll get a pitch black image because the values used in the Sun/Sky lights don’t make physical sense… You could increase them (a lot) until you start seeing something and use a real photo as basis to discover some proportion between UE4 units and Lux per example. And you can do that indeed but then you’ll start getting glitches all around (with reflection probes and auto exposure) because those other systems clearly are not prepared to work with such high light values.

The user Daedalus51 has a great post where he brilliantly discusses about that in Epic’s forum: https://forums.unrealengine.com/development-discussion/rendering/1414326-4-19-physical-lights?p=1454629#post1454629 (That guy is awesome by the way. He works at Dice and has a series in Youtube about lighting in UE4. Lots of precious information there: https://www.youtube.com/user/51Daedalus/videos)

In the end what I do is to use real photo references to eyeball the correct light intensities while keeping the sunlight and skylight values at their “normal” range in the engine.

  • I start setting a Post Process volume with no effects at all (0 bloom, 0 vignette, fixed exposure…).
  • I place a sunlight with a value similar to its default (something around 3.14) to make sure all the other systems will behave properly.
  • I place my skylight and set a skydome with the sky material (unlit) I want.
  • Sunlight position must be adjusted to match the Sun in the texture.
  • I plug a multiplier parameter to the sky texture, create a material instance and tweak it in real-time until I get the light intensities the way I want. Here I use the photo references (or sometimes only guessing).

That’s with the preview lighting. After building lights things changes and another round is needed for tuning. Sometimes Post Process adjustments may be enough though.

Each change in light condition requires at least a new round of that process. If I change Sun height and sky texture it’ll not be possible to guess the new values that will result in precise lighting for the new condition. And I’m the kind of guy that is constantly playing around with light until I find something that pleases me, so I spend a lot of time with that process.

The project is huge but only the house and some elements around it are static. So I wouldn’t expect 12h of light building… My last interior project builds in 3~4h with same lightmass settings and has similar amount of static objects. That is a lot of room for optimization though. Mainly in lightmap resolution for those little meshes imported with Datasmith. Maybe I can improve that time if I can decrease the RAM usage so my system won’t use virtual memory cashing.

1 Like

Thanks you!
I started experimenting with Unreal for archviz back in UDK times (UE3) 5 years ago. Here is a super old experiment I did if you’re curious :smile: https://youtu.be/Pdxfz4tR8xw

The learning curve was indeed tough back then, but still easier than any other game engine in my opinion. That allied with the graphics potential of UE4 was what kept me investing in Unreal. The engine is not perfect and is still far from the ideal tool for archviz. It still requires spending time with extra stuff in comparison with dedicated archviz softwares like Lumion. But Unreal brings all the possibilites that only a powerful game engine can provide, mainly when we talk about interactive experiences (and I believe that is the future of archviz).

I have no doubts it’s way easier to get the hang of it now. If you have a polished project in your 3D modeling software, with Unreal Studio you can pretty much get it decently running in Unreal with a couple of button clicks. https://docs.unrealengine.com/en-us/Studio

You’ll still need to do some work in the engine after importing to get a polished viz. But it’s nothing compared to the workflow needed a couple of years ago.

1 Like

@rabellogp Very beautiful work!!
Since u are using stationary sun and sky, I am guessing u are not using distance field ao, are u using distance field mesh to cast shadows or cascaded works just fine?
I remember u mentioned in the past u used baked ao to vertex for self shadows of the trees.
Is grass using translucent or opacity mask? Is shading model- foliage, subsurface or subsurface profile?

Excellent work!
How did you made the handshake effect for your video renders? I suppose is it some blueprint code.

And here is one more AMAZING Handheld Camera clip by @rabellogp for the interior this time!

Thanks! Yes, I’m using DF Shadows and cascaded shadows.

Cascaded will give you the definition you need for medium-small details nearby. You must tweak Dynamic Shadow Distance Stationary Light and Distribution Exponent to achieve what bests suits you. I also like to decrease Shadow Bias (default is 0.5 and I usually set it to 0.3 or 0.2) to increase definition. The trade-off is that you’ll start getting visible shadow banding so it must be tweaked with caution.

Outside the Cascaded Shadows radius the DF Shadows take place (if they’re enabled, of course). They aren’t near as detailed as cascaded but they do a good job for medium-far distance foliage (and even buildings sometimes). I like to reduce Ray Start Offset Depth Scale to get some extra detail on them.

shadows

Sometimes I also use Contact Shadows to add some extra detail to small objects. It’s good for grass, but be you need to be careful because real lawns are denser than what you’re probably recreating in real-time and the individual blades shadows in real life won’t be so noticeable as it will in your sparser UE4 lawn (thus revealing a lot of contact shadows in a unrealistic way). Contact Shadows also adds artifacts that are very apparent in flat surfaces.

About AO baked to vertex color, that’s a very handful SpeedTree feature. You can obviously use it for controlled AO in the materials but also as a mask to reduce specular, reduce subsurface and decrease color intensity in the interior of the tree. It gives you artistic power to compensate the absence of baked lighting in your foliage.

For the grass material I use Masked - Two Sided Foliage (with the same vertex AO tricks I use on the trees).

Thank you! It has some blueprint coding involved but the overall process is a lot more lazy than that. :laughing:

I’ve used a Vive and a default First Person Char actor:

  • Add a SceneCaptureComponent2D in the FPChar linked to one of the Motion Controllers.
  • Add a cube linked to the same controller, re-escale till you get a rough smartphone shape :sweat_smile: and apply a material to it with the render target linked to the SceneCaptureComponent2D. Now you have a smartphone filming stuff in VR that you can actually see the stuff it’s capturing in VR :joy:
  • Add a camera in the world
  • In the Level Blueprint, add references to that camera and the actor char.
  • Use the Tick node to update the camera’s location and rotation to the same value you’re getting from the character’s SceneCapture
  • Add that camera to the Sequence Recorder
  • Hit “record” button, start playing your game in VR and recording stuff with your fake smartphone

In the end you’ll have a sequence with a motion captured camera. Then you can play it or compose it with other sequences, etc…

2 Likes

@rabellogp Thanks for the info :- ) Are u also using dither opacity with masked?

Nope. The opacity masks are untouched straight from Speedtree.

Thanks for the detailed answer.
Very cool solution :slightly_smiling_face:

I have an already created Sequencer animation in UE. I couldn’t reproduce the camera movement in VR.
I hoped you have implemented Camera Shake Animation, like Epic did in their demos.


Unfortunately, I have didn’t find any documentation/tutorial about this approach.


As a newbie in UE4, I could only admire this project! Amazing!

Hey, guys.

A couple of pictures of some lighting tests that I’ve been doing:

I’m trying to use Lighting Scenarios so I can keep 2 or 3 different lighting situations in that same main level. The drawback is that the amount of RAM used will increase a lot since the lightmaps of all the Lighting Scenarios are loaded at once with the main level.

The other way around would be keeping 2 or 3 copies of the same level with different lighting setups but that workflow is a nightmare when you’re constantly updating the project.

For each Lighting Scenario level I have different:

  • Direct light (sun light)
  • Sky light
  • Sky dome with different EXR sky texture

I’ll be posting the final footage of that project soon.

1 Like

Looking forward to the final footage. Excellent work so far, mate :- )
EDIT: Btw, have u seen this:


Any thoughts on this :- )

1 Like

Thanks!
Yes. I’ve been following that topic. Really promising stuff :grinning:

Hello guys.

As I said in the main post, I did a week sprint last month to create a real-time footage of that project for my CGarchitect Award 2018 submission (I got it confirmed in the end).

I was holding it until they published the results. As I didn’t get between the final nominees, I’m sharing it here with you guys with some details about how it was done:

The award rules required a real-time footage (at least 30fps - 1080p) and some player interaction. So I divided the video in two parts. The first one is a Sequencer based footage with simple camera cuts and a song. The second one is a first person walk-through that I controlled with mouse and keyboard.

For the interactive part I set up some sound effects to contribute with the immersion:

  • 5min looped ambient sound with wind and distant birds. No localization, it’s always active no matter where you are in the level. There is also a wind chime at distance in that track that I found it added a cool atmosphere to the level.
  • A couple of short birds songs that are randomly activated (loop interval between 10s and 1min). Those ones are localized in some of the trees around the house with a 15m radius
  • A crossing propeller airplane that randomly triggers in a window between the first 10s and 5min of gameplay.
  • Different step sounds for grass, gravel, concrete and wood. The player character blueprint handles the surface detection.

    Not the best solution for the sound triggering… But I didn’t have enough time and that one got the job done.

I’ve also added an Audio Volume inside the house that slightly reduces overall sound volume and cut off the higher frequencies (all those settings are easily changeable in the Ambient Zone session of Audio Volume settings).

The resolution was set to 1440p and the framerate locked at 30fps (it was oscillating between 33 and 45 without the locking). I’ve captured the screen with Nvidia Shadowplay at 60fps (it produced a smoother video - less stuttering).

PS: The project wasn’t finished when I made that video. So I’m not considering it “official”. I’m still working on my final portfolio footage for that project (my agenda got so crazy during the last couple of weeks and I had to put it on hold for a while). I’ll definitely finish it this weekend :sweat_smile:

Cheers

2 Likes